Sometimes in an e-mail we receive something that catches our attention and causes the red lamp to flicker. This can be the sender’s address, a strange attachment or a link in the body of the message. Then we want to quickly and effectively find out what we are dealing with, especially if we suspect that someone would like to access our confidential data or the data of the company for which we work.
In the following article I will show you how to easily analyze the operation and traces left by malware. We will work on a real file that caused huge losses in a country overseas.
Vector Attack
An e-mail comes to the mailbox of one of the company’s high-ranking employees. It is written fluently in the language of the recipient and does not contain gross spelling errors, suspicious requests or attachments. However, it successfully imitates a bank statement and encourages you to open the link at the end.
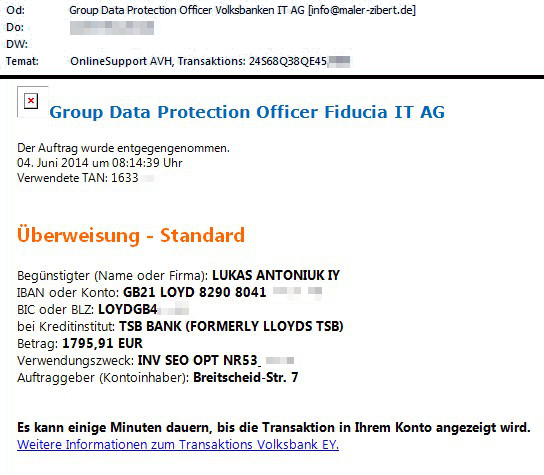
The example presented by me refers to one of the extensive, professional malware campaigns. Its purpose is to infect a large number of recipients, and clicking a link in the message begins downloading the file on one of the previously prepared machines. It can be a hacked web server that serves a file or uses an error in the browser through the Exploit Kit.
In our case, the attachment downloaded from the link is in the form of a ZIP archive. Inside it there is a PDF-like file. Most users can be fooled by the icon without paying attention to the double file extension and launch it.

Picture nr 2 File icon
Finally, the infected station ceases to be under our control. The attacker gains access to our files, entered passwords, internal network and can modify the operation of other programs (e.g., change traffic in an encrypted connection with the bank and insert its own HTML code in it). The antivirus program did not have a chance to detect this previously unknown threat lurking in the shadows.
File Analysis
Static analysis
File type
At the very beginning we need to find out what kind of file we have to deal with. The extension itself can be confusing, which is why we will use the Linux file tool. It is equipped with a signature database, after which it recognizes the file type:
|
1 2 |
$ file INV\ 53.PDF.exe INV 53.PDF.exe: PE32 executable (GUI) Intel 80386, for MS Windows |
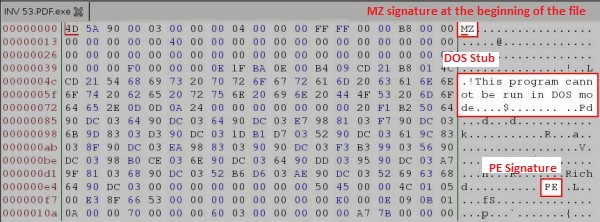
This is a Windows PE executable file (popular EXE). We will open it using any hex editor and make sure that we are able to locate the sections marked in the following figure (the beginning of the file). We use a graphical bless editor to display the binary content of the file along with its textual ASCII representation.
Strings
Browsing the hex-editor of long files in search of readable text mixed with binary code is very time-consuming, so we will use another tool – strings. It searches a file for a sequence of at least 4 ASCII or UNICODE characters terminated with a terminator. After such a procedure, if the file is not encrypted or packaged, we should be able to deduce what the program can do. In addition, if the inside contains phrases indicating strictly our organization (e.g., names of internal resources, company name, employee / customer data), we should think twice before we make this file available on the Internet.
|
1 2 3 4 5 6 7 8 9 10 11 12 13 14 15 16 17 18 19 20 21 22 23 24 25 26 27 28 29 30 31 32 33 34 35 36 |
$ strings -a INV\ 53.PDF.exe | less !This program cannot be run in DOS mode. .text `.rsrc @.rdata @.data .reloc upRro ... WaitForDebugEvent PeekConsoleInputW WinExec UrlEscapeA CreateDirectoryW QueryDosDeviceA CreateFontPackage ReadConsoleOutputA GetProcAddress_ PathStripToRootW SHDeleteKeyW GetFileTitleA PathGetDriveNumberA OpenFile_ DeleteTimerQueue SetLastConsoleEventActive _lopen_ PathIsUNCServerW MergeFontPackage GetTempFileNameW FreeUserPhysicalPages GetSaveFileNameA ... C:\zdbfkyp c:\nwebCOps\akqk\yhoppHjZG\Qxof c:\bFzflj\nttBL\EyVrGApgb\DogikYid C:\poxmow\dDta\BJpwx\dyHYtcu |
In the file, in addition to the standard strings and mass of garbage (resulting from the wrong interpretation of the binary code as text, which you have to get used to) we come across something that looks like the Windows API function names (import table). Its analysis will prove invaluable for the Microsoft documentation search engine.
The last four look like random or encoded file names. Nevertheless, on this basis it is difficult to say whether and for what. In this version, they look more like trash added to make analysis difficult.
The MD5 sum
In the last step of the static analysis (without running the file) we will generate its MD5 hash. Using such a shortcut in the search engine (e.g., Google and on the VirusTotal website) we can easily check if someone has analyzed the file before. MD5 hashes only consider the contents of the file, and even small change in file will cause difference in hashes. This gives us a simple tool to “name” the file, and we are sure that the sample from which the hash has been generated has the same content.
|
1 2 3 |
$ md5sum INV\ 53.PDF.exe 0aecb730b8c1a06534cf393f5c0f01fd INV 53.PDF.exe |
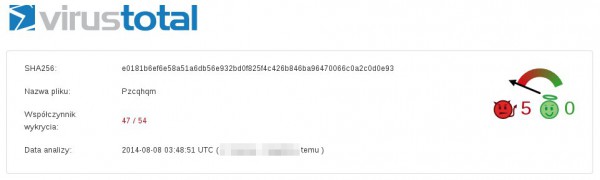
In the VirusTotal results, we can see that the file is already quite old, and most anti-viruses are able to recognize it (47/54).
We already have a certain concept with which file we have to deal with. To not run applications, in the next step we could use a disassemble, such as IDA Pro. However, this requires the skills of Reverse Engineering and knowledge of IDA Pro, and it is time-consuming. We will therefore try to launch the program in the environment we control.
Behavioral (dynamic) analysis
So far, we know what file we’re dealing with and we have a few indications. However, we do not know what the analyzed file actually does or how it uses the Windows API and the paths previously learned. Therefore, we will run a sample in a simulated, isolated environment. Next, we will gather information about the behavior of the application from the measurement tools, and on this basis we will try to draw conclusions. First and foremost, we will be interested in creating and deleting files, running processes, and making network connections.
Sandbox
As one of the first steps, we should consider launching the application in the on-line sandbox provided free of charge. These are fast environments that do not require prior preparation, can support many commercial antivirus engines and give a ready result in the form of reports. Before sending a file, we should make sure that it does not contain information that we would not like to disclose (e.g., customer/employee data, as well as the information that a given file is subjected to a deeper analysis). Because reports are usually publicly available, we can also find out if someone has previously provided a particular analysis file.
The three environments presented below have been chosen for the sake of transparency of the reports presented, mutual complementarity and their high efficiency. Launching in more than one environment allows us to use more tools for analysis, types and system configurations. There are many techniques that allow malware to detect and avoid analysis in such an environment. Running a file in many different sandboxes gives you a good chance of avoiding such traps.
VirusTotal
VirusTotal is a sandbox connected to multiple antivirus engines. Detecting a file as infected is a significant sign that we are dealing with malware. We will focus, however, on the description, which is located in the tab Behavior information. We draw conclusions from the above information:
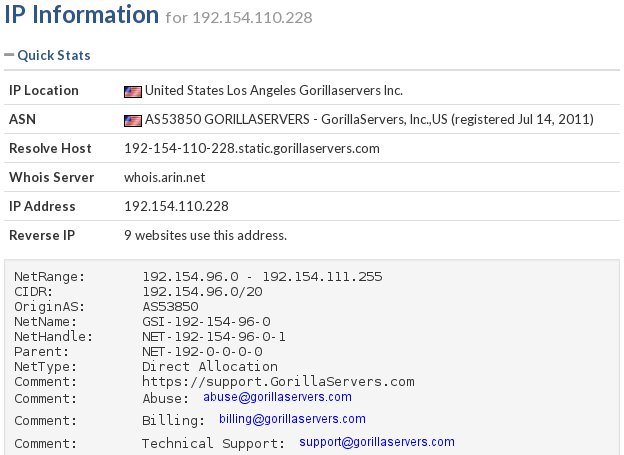
We find information about the IP address to which you have tried to connect. Valuable data about this address can be found, for example, on Robtex (navigation using the beam at the top).
Cuckoo (malwr.com)
Depending on your preferences, we can use the free malwr.com online service or install and configure it on your own machine (used software, own IP address, etc.). Regardless of the chosen method, the results are obtained in the form of a report, the review of which provides further information.
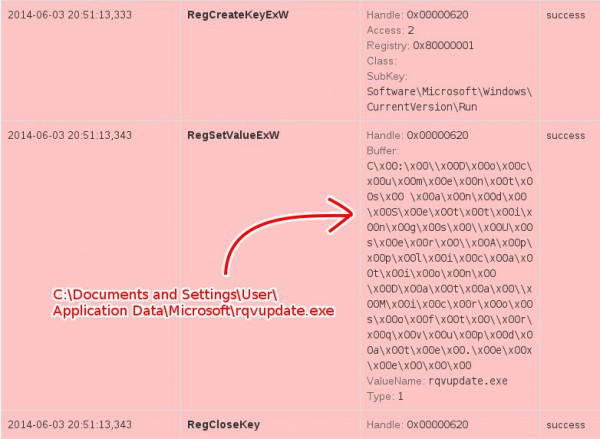
In addition to the traces we were able to obtain previously, we discover, among other things, the created auto start register keys by the Explorer.EXE process (the name of the malware file is different from the one from the previous website and most probably created pseudo-randomly).
From the information provided by Cuckoo, we also learn about many interesting, low-level events:
- Explorer.EXE: writes EXE files to memory (this is indicated by, for example, the signature “MZ” at the beginning of “This program cannot be run in DOS mode”)
- Explorer.EXE: looks for the library responsible for RSA asymmetric encryption
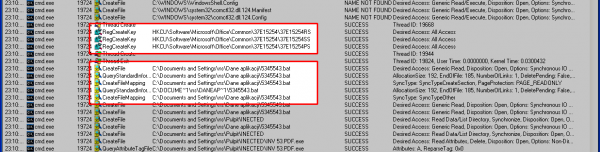
- cmd.exe: we discover saved and run .BAT file (below)
- cmd.exe: creating a file //PIPE\larpark//
- cmd.exe: deleting the initial .EXE file
We also have the opportunity to look at the BAT file created by the application. It is used to automatically delete a file with malware after a successful infection:
|
1 2 3 4 5 |
:l if not exist "C:\DOCUME~1\User\LOCALS~1\Temp\2014_0~1.EXE" goto e del /Q /F "C:\DOCUME~1\User\LOCALS~1\Temp\2014_0~1.EXE" goto l :e del /Q /F "C:\DOCUME~1\User\APPLIC~1\5331169.bat" |
Anubis (anubis.iseclab.org)
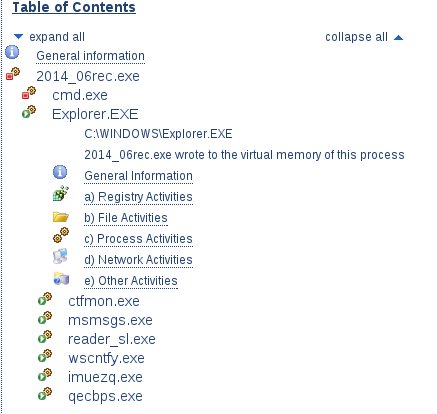
The report from the third environment provides further details in a condensed form. Because many files take part in the infection, it is easiest to navigate the report using the attached table of contents at the top. We get to know, among others:
- the new name under which the file is copied—”tsoedit32.exe”
- we learn about many modified registry keys
- how to communicate with the Internet using the device \Device\Afd\Endpoint
- we get to know the next domain that was tried to communicate: 80.91.191.158:8080
- the Explorer.EXE process begins to monitor the mouse cursor
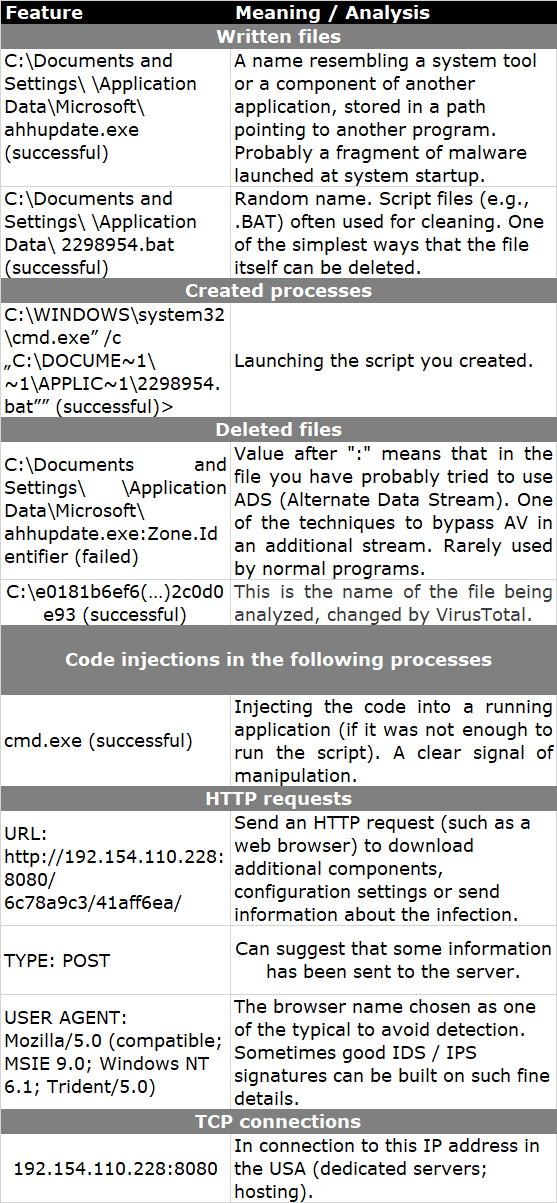
Below is a list of all key features that we managed to achieve during the analysis.

Virtual Machine or Physical System
Sandboxes, despite many advantages, have some important disadvantages. They are relatively easy to detect, and they lose their usefulness if they are detected. Sometimes, they are also unable to provide the level of interaction expected by the malware, such as launching a specific application, accessing the appropriate page or even conducting atypical launch of the executable file.
We will try to take matters into our own hands. We will run malicious software in a dedicated, isolated system in the presence of tools that will save information about its behavior. We can use a virtual machine or a dedicated physical system for this purpose, and the choice between them depends on the resources available and your preferences. The key features of these solutions can be found in the table below:
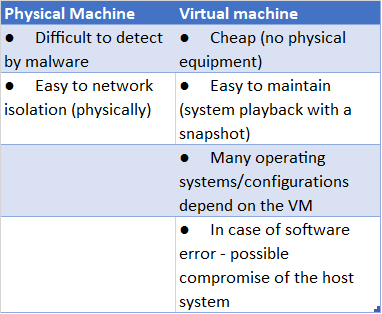
In our case, we decided on a virtual machine based on free VirtualBox software. As a guest system, we chose the most current (but not supported) version of Windows XP. The installation of the environment add-on (VirtualBox AddOns) has to be carefully considered, because in its basic version it is very often detected by malware. Then, before running the malware, we install selected analysis tools. You should also remember to disconnect the machine from the network. We do not want the infection to get out of hand, as we cannot only harm ourselves.
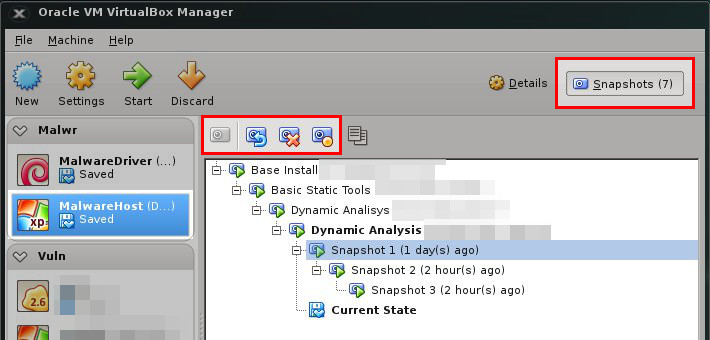
Snapshot
One of the most convenient tools when running malicious samples is the snapshot function built into most virtualization tools. After installing the system and tools and configuring everything, we choose this function, and everything we have done so far inside the virtual machine is saved and frozen on the disk (the whole state of the operating system, disk and memory).
Later, when we run anything (e.g., malware) and any changes will be made, the snapshot function will allow us to return to the previous state. It significantly simplifies and accelerates the return to the environment, which is waiting to analyze the next sample, and its behavior will not interfere with its predecessors. The figure below shows how to use this function:
Tools
Regardless of whether we chose a physical or virtual machine, we install tools on it that will help us monitor running malware. We are mainly interested in features that will allow us to easily detect it. We will use for this purpose created, deleted and modified files and catalogs, registry keys, started processes and all signs of network communication.
Since we run malicious software on the same station as the analysis tools, in most of the cases described, it may happen that they will be detected by the malware. So we should try to turn them into their less known counterparts.
Below is a description of a few preferred programs that should complement each other. We turn on all of them before launching a malicious file and wait for a moment that should allow it to perform malicious actions. Then we check the results of the tools. Some of them, due to the wide range of use, would deserve a separate article. However, the presented possibilities calmly suffice for our applications.
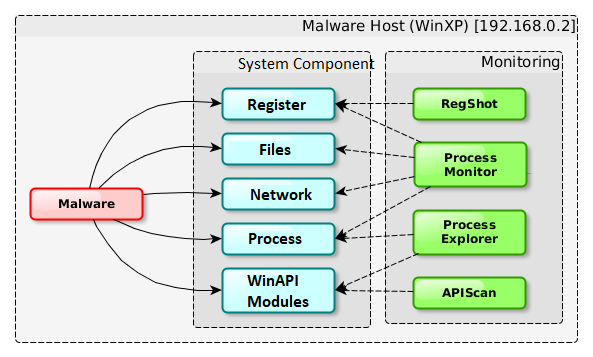
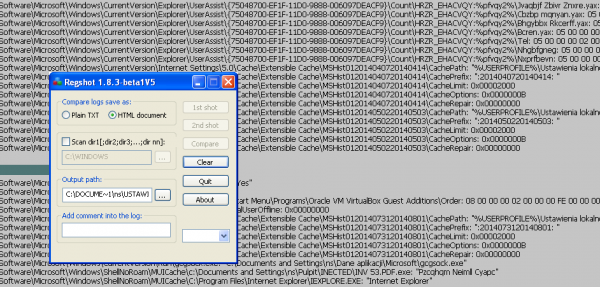
RegShot
RegShot is a simple tool for examining registry changes. Before starting the sample, save the state of the registry with the use of the 1st shot button. We do not close the program, and after running the malware select the 2nd shot button. RegShot will then download the current contents of the register for the second time and compare them. Discrepancies (i.e., added, deleted or changed values/keys) will be saved to the file and displayed. This way you can quickly see what has changed between these entries.
The program is very easy to use. It can export reports in text and HTML formats. The main drawback of its use is the lack of information about which application has made changes to the registry, and this results in many keys changing during normal system operation. The generated report will also not include results that were changed after the first screenshot and restored before the next one.
ProcessExplorer (SysInternals)
Process Explorer is a great tool from the SysInternals package. It is a process manager, but unlike the standard one, in case of starting or closing the process, it displays this information in the appropriate color for some time. Processes are presented in the form of a tree, which makes it easier to get a sense of the situation. Clicking the right mouse button presents a rich context menu, which you can use to check which libraries the application uses or to list strings (as you could do with strings). In addition, it allows you to display strings not only from a static file but also from the memory of the running process. The comparison of these lists allows you to quickly find processes that have been injected with additional code. In many cases, malware is packaged or encrypted to avoid analysis and is unpacked as soon as it is launched. The ability to create a list of strings in the process memory after this operation provides character strings in their useful form.
ProcessMonitor (SysInternals)
Process Monitor (also SysInternals) is one of the most advanced tools presented here. It allows you to monitor some of the actions (disk, registry, processes, network) performed by applications running in the system (all rather than only the one chosen by us).
Before launching a malicious file, we define a view filter for the events to be presented. During operation, the program collects actions performed by all applications and presents only those selected using the filter. In our case, we filter by the name of the file being launched.
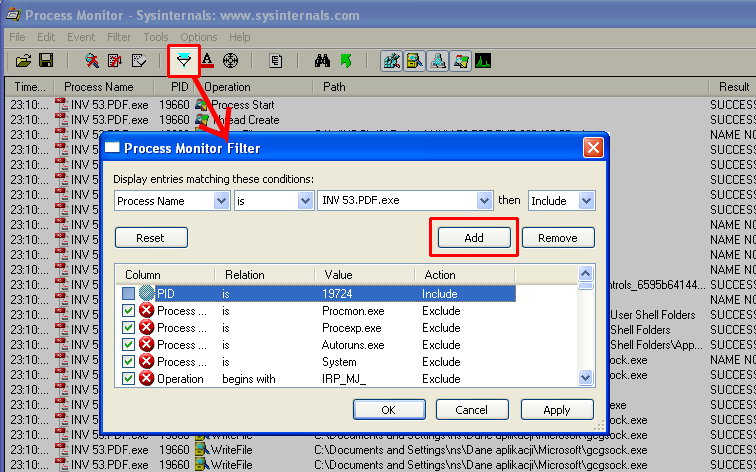
Then, using the START/STOP button, we start monitoring and run the analyzed file. After a short time, we stop the further collection of events with the same button (because their number starts to become problematic after a while).
With four buttons at the top, we select the categories of events that interest us (Registry, Filesystem, Network, Process). The list below contains all registered events from the categories selected by us.
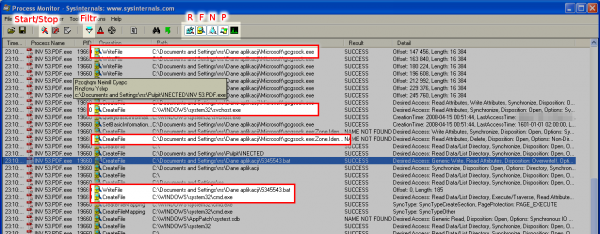
You need to be prepared for the tool to generate extensive results (related to the normal operation of the application, such as loading the libraries). Their identification requires some practice and knowledge about default actions performed. When we see it, it is worth using the right-click context menu to choose to hide uninteresting events and to view only the others.
When viewing events, we quickly came across information about running another process—cmd.exe. The PID identifier is next to its name. The operation of all processes is saved in Process Explorer, so after adding this process, we do not need to run anything again. We change this filter in the same place as before and we add PID to the newly opened process to include it in the results.
Internet Simulation
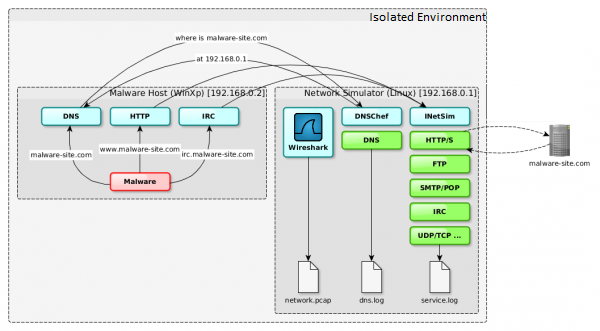
The malicious piece of code will try to communicate with the outside world many times. This will significantly facilitate the identification of infected machines in the local network, but in a controlled environment we do not want to expose other machines to danger. Therefore, if we have to, we should be very cautious about displaying our pandora’s box to the Internet. However, we can easily prepare an environment that will help us convince the malware that it communicates with machines outside the local network.
We will use a second virtual machine connected to the internal network of virtualization software for this purpose. We will install DNSChef and INetSim on it and set the host as the default gateway. In this setting, all attempts of malware to communicate with the outside world will have to go through a second machine, the setting of which will determine if the first will receive a crafted response, or maybe we decide to redirect some services to real machines out of our control (MITM). In both cases, we will log all communications for later analysis.
The diagram of such a simple connection (along with the services being marked) can be found in the diagram below:
DNSChef
DNSChef is a configurable DNS PROXY, prepared for both pentest and malware analysis. It allows you to send defined, false DNS responses to all or only selected queries. In addition, it prints all received inquiries with responses for them, which significantly facilitates analysis.
In our case, we set it so that all names except * .google.com point to a station that simulates network services. After such a procedure, the malware trying to connect to the domain, e.g., sekurak.pl, will eventually connect to the service we have issued. The example below:
|
1 2 3 4 5 6 7 8 9 10 11 12 13 14 15 16 17 18 19 20 21 22 |
# ./dnschef.py --interface 192.168.0.1 --fakeip 192.168.0.1 --fakeipv6 192.168.0.1 --fakemail 192.168.0.1 --fakealias 192.168.0.1 --fakens 192.168.0.1 --truedomains *.google.com _ _ __ | | version 0.2 | | / _| __| |_ __ ___ ___| |__ ___| |_ / _` | '_ \/ __|/ __| '_ \ / _ \ _| | (_| | | | \__ \ (__| | | | __/ | \__,_|_| |_|___/\___|_| |_|\___|_| iphelix@thesprawl.org [*] DNSChef started on interface: 192.168.0.1 [*] Using the following nameservers: 8.8.8.8 [*] Cooking A replies to point to 192.168.0.1 not matching: *.google.com [*] Cooking AAAA replies to point to 192.168.0.1 not matching: *.google.com [*] Cooking MX replies to point to 192.168.0.1 not matching: *.google.com [*] Cooking CNAME replies to point to 192.168.0.1 not matching: *.google.com [*] Cooking NS replies to point to 192.168.0.1 not matching: *.google.com [05:02:52] 192.168.0.2: proxying the response of type 'A' for www.google.com [05:04:14] 192.168.0.2: cooking the response of type 'A' for sekurak.pl to 192.168.0.1 |
INetSim
We will also use INetSim, which is a simulator of many different network services. When you try to connect to a given service, it matches a defined banner or, for example, in the case of the HTTP/S protocol, it allows you to tighten images and other files. It was written in such a way that the initiating party had problems with distinguishing such a service from the real one. It can also be used as PROXY, which will save and forward the request to the original machine. It is easy to use and has a lot of configuration options with good basic settings (however, take a moment to change the standard banners in the file conf/inetsim.conf, because it presents itself as INetSim).
Depending on the services we choose, a connection to, for example, an SMTP port will allow us to carry out a limited mailing session, and when we connect to the HTTP port, we will see an example web page. We will launch all services supported by INetSim.
Wireshark
The last tool we should support is Wireshark. It is a network traffic analyzer with a convenient user interface. It allows you to record information and characteristics of network traffic, which significantly facilitates the building of network signatures. In addition, it records and allows to capture other attempts of attack and communication from an infected machine and not recorded by INetSim.
The End
We have learned from the article what threats can be caused by launching suspicious files. During the static analysis we verified that, in reality, we are dealing with malware. We examined the format and content of the file in terms of its characteristic features. We discovered the malware sample by running its behavior in a controlled environment, which allowed us to prepare to build signatures that detect infected stations and future infections. We have also gathered a proper workshop that will allow us to deal effectively with new challenges in the future, and we have gained basic knowledge of how to use the software.
Below is a list of key features and behaviors of malicious software that we were able to determine during the analysis and which we will use in the following parts:

This is the first article in the series in which we will learn, among others:
- How to effectively respond to incidents related to malware (from detection of infection, to isolation to cleaning up the environment and drawing conclusions).
- We will prepare for the fight and
learn how to choose features and prepare signatures in such tools as:
- yara – engine for classifying files. We will learn to detect different variations of this threat.
- snort – network intrusion detection system.
- gnu tools – use of any administrator’s friends in the effective detection of incidents.
- ssdeep – a tool allowing to determine the degree of similarity between files.
- The malware we analyze will cease to be an anonymous threat to us. It turns out that it is “Emotet”, a banking malware stealing data, among other things to log into the bank. This malware is used for attacks in the US.