Windows security: reconnaissance of Active Directory environment with BloodHound.
In this article we will take a closer look at the BloodHound tool – Six Degrees of Domain Admin. The application was developed in JavaScript and built using the Electron platform. The graphical visualization uses the Neo4j database.
During the experiment, we will use a Windows workstation and a Windows Server station (both stations as virtual machines on Microsoft Azure) and any Windows computer. Because of the switching between environments in order for the Reader to better find which drawing is from which machine in the text, designations have been used:
- the figure refers to: Windows workstation
- the figure refers to: Windows Server
- the figure refers to: any computer (with Windows)
- the figure refers to: Windows workstation or Windows Server
See figure captions for designations.
BloodHound software uses graph theory to uncover hard-to-find and often unintended relationships in Active Directory and Azure environments. Both attackers and defenders can use the tool to easily identify complex attack paths and devices that may store valuable resources or contain user accounts with high privileges.
<”Active Directory” graph>
The BloodHound tool is used for data analysis. To collect a set of data, simply run SharpHound or AzureHound on a domain-connected system in an Active Directory environment or a non-domain-connected system (as presented next). BloodHound’s Windows version consists of two main components:
- information gathering programs such as a PowerShell script called AzureHound.ps1 and an application for the .NET platform called SharpHound.exe,
- BloodHound.exe program for visualizing the collected data in the form of graphs.
There is also a version of the BloodHound tool for Linux systems. However, it is not the subject of this article.
It is worth mentioning that Dirk-jan Mollema has created a BloodHound.py script that allows you to collect information from Linux, macOS and Windows systems, but it is required to install support for the Python 3 language. Note: The script is not officially supported by the BloodHound developers and, according to the description on GitHub, works with BloodHound version 4.1 or later.
You can read about what a Windows-based IT network looks like in the structures of various organizations (e.g., enterprises) in the article Windows security – what is LSASS dump. How to protect against it? (sekurak.pl). In short: computers are connected in a domain controlled by domain controllers. Such interconnected machines running under Windows can form extensive structures called trees and forests. It is for this reason that the BloodHound tool is very useful for administrators, blue teams, cybersecurity analysts or threat hunters, as it illustrates in graph form the links between computers connected in a domain. This makes it easier to remove hidden and unwanted links that may be dangerous, and thus enables quick reduction of attack paths. But be warned: in an analogous way, the program can be used by red teams during security testing and even by cyber criminals during an attack on an IT network.
Preparing a domain environment with Active Directory on the Microsoft Azure platform
We will use the Microsoft Azure cloud platform to build an environment that will serve as a laboratory. The Azure web application interface allows you to easily create virtual machines (Figure 1).

Creating a virtual machine that will be a domain controller
We will start building the lab environment by creating a virtual machine with an example of Windows Server 2019 Datacenter (Figure 2). In reality, there are more computers acting as a domain controller in an enterprise, for example, for purposes of greater availability and reliability.
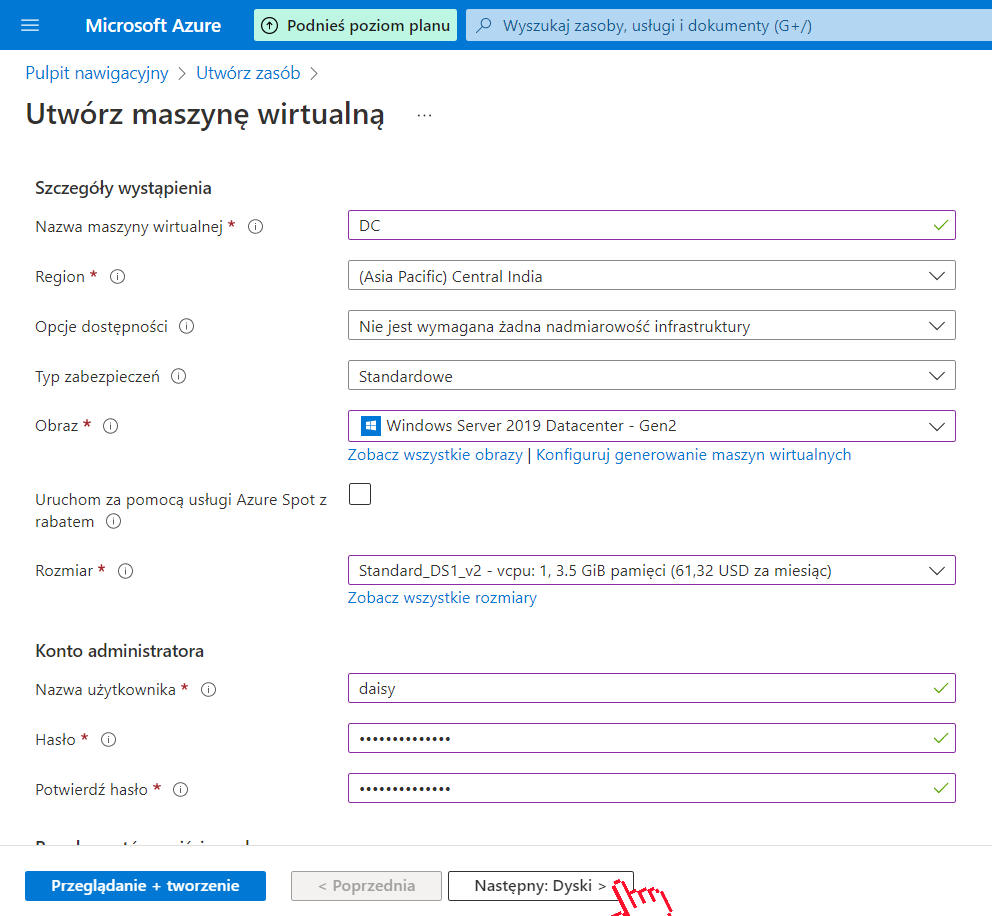
Figure 3 shows the screen from the basic configuration of the virtual machine. To simplify the conduct of tests, it is a good idea to set the creation of test VMs on a single network.

The last step of the virtual machine creation wizard is shown in Figures 4 and 5.


You can connect to the created virtual machine (Figure 6) using remote desktop (RDP), SSH or Azure Bastion. For experimental purposes, a simple remote desktop will suffice. The machine was given the example name DC as an abbreviation for domain controller.

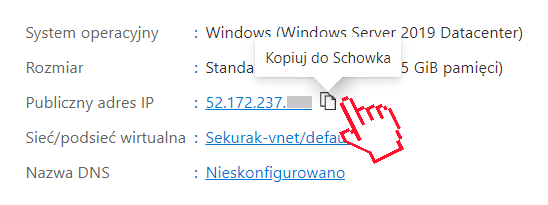
In order to connect to the virtual machine via the remote desktop, you will need data such as the public IP address (Figure 7), username and password (set earlier in the wizard).
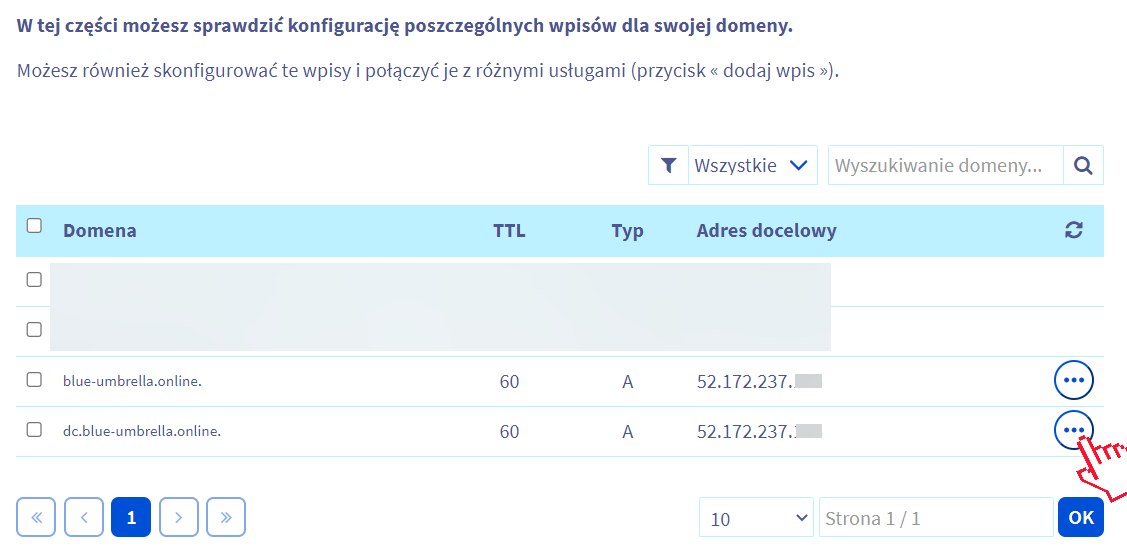
If you want to use a domain name (not an IP address) that is easier to remember, you can use your own Internet domain and bind it to the IP address with a type A entry in the DNS zone. This applies to IP version 4 addresses. For IPv6 addresses, the record type is AAA.
To connect to a remote machine, enter its public IP address (or domain name), username and password. This is shown in Figure 9.

Once the remote desktop is successfully connected, the graphical interface of the Server Manager tool, which is used to administer Windows servers, should appear (Figure 10).
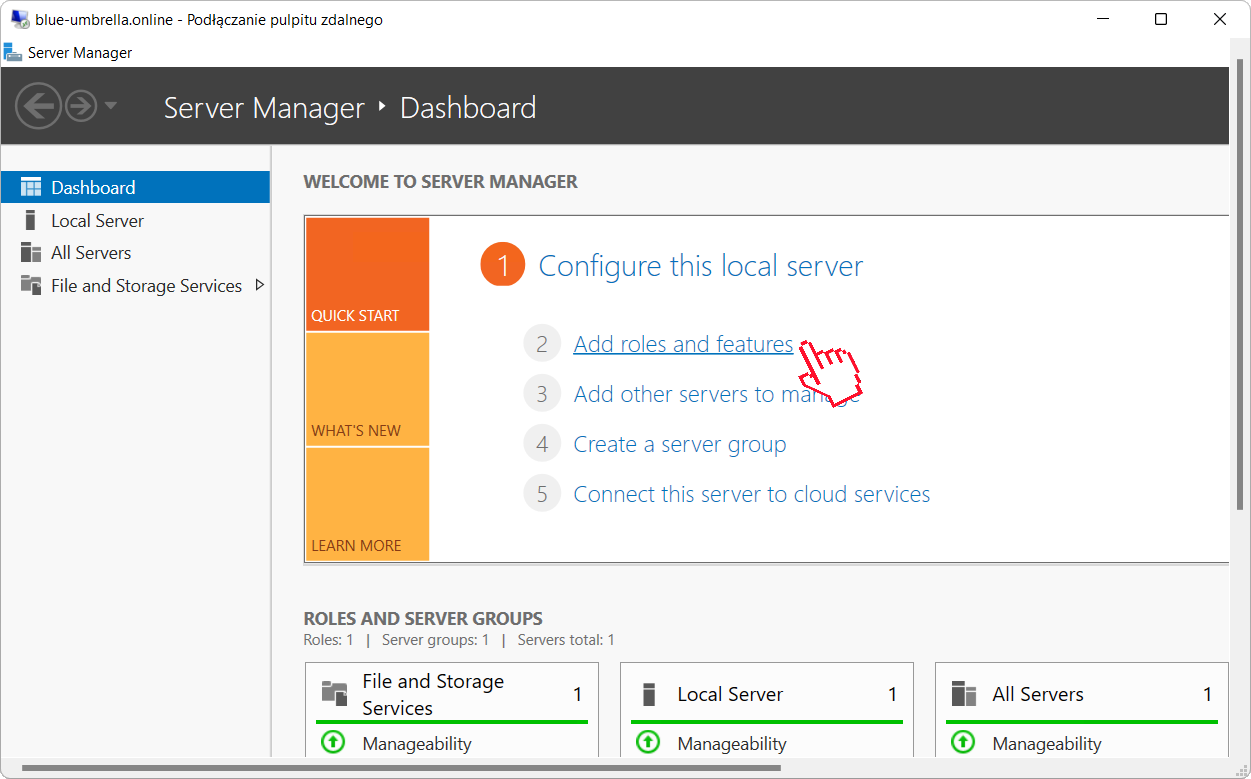
To create a domain environment, install the Active Directory Domain Services role by clicking Add roles and features (Figure 10 and 11).

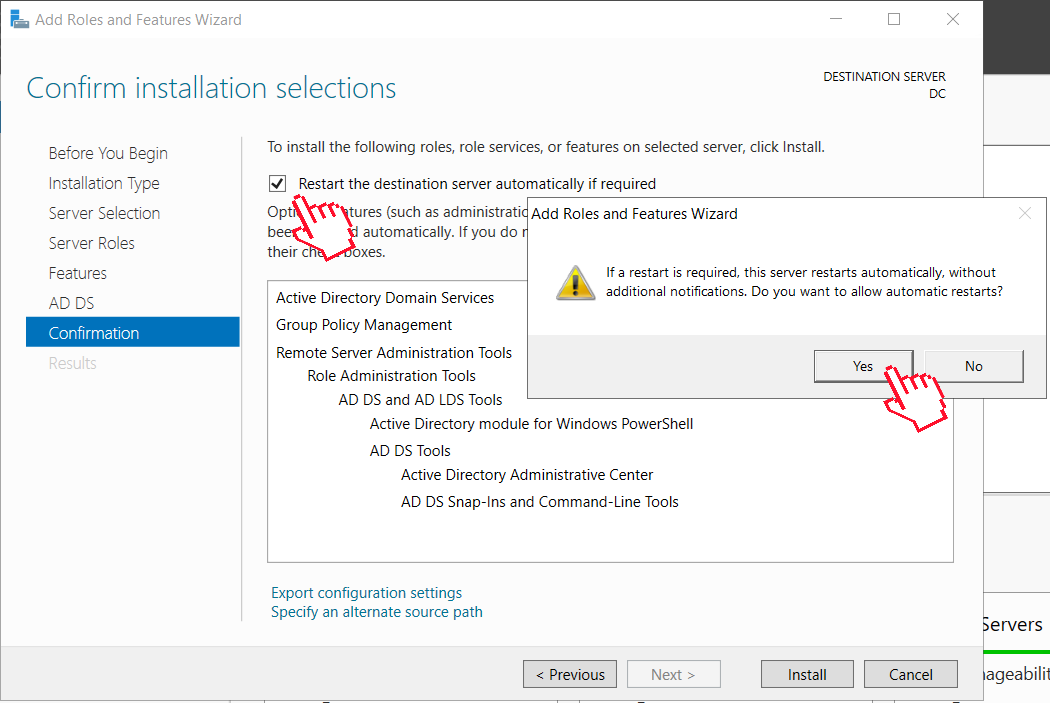
Once the installation of the new role on Windows Server is complete, a reboot of the virtual machine will be required (Figure 12).
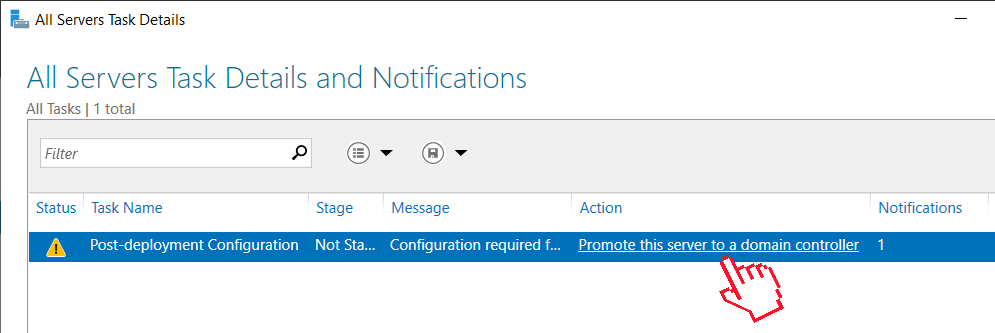
To set the selected VM to become a domain controller, select Promote this server to a domain controller (Figures 13 and 14).

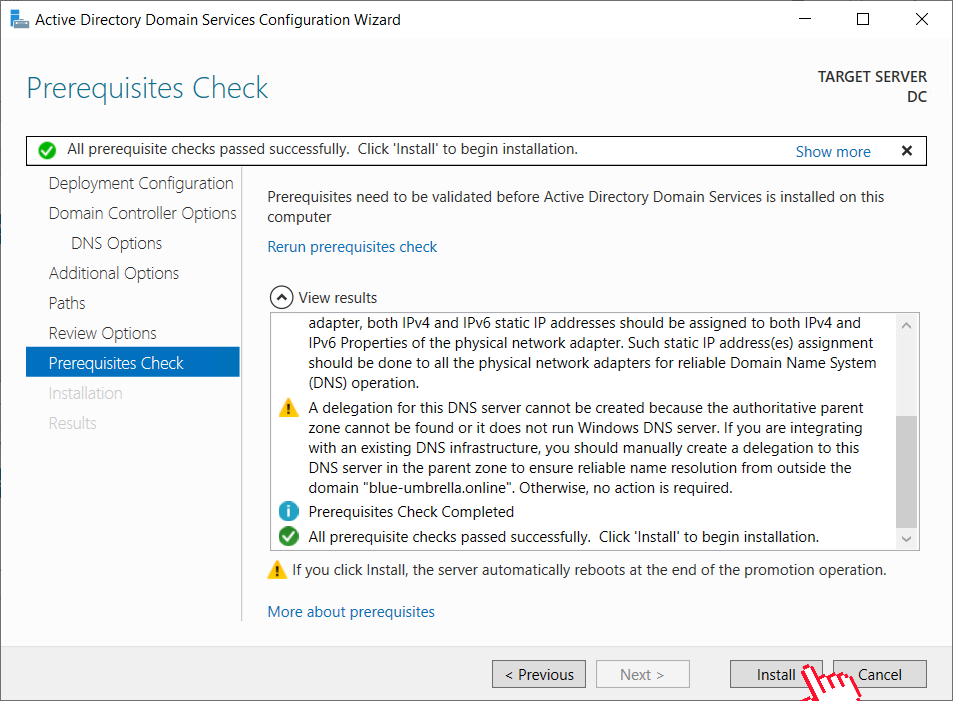
For experimental purposes, you can create a new forest with a previously owned Internet domain (Figures 15, 16 and 17).


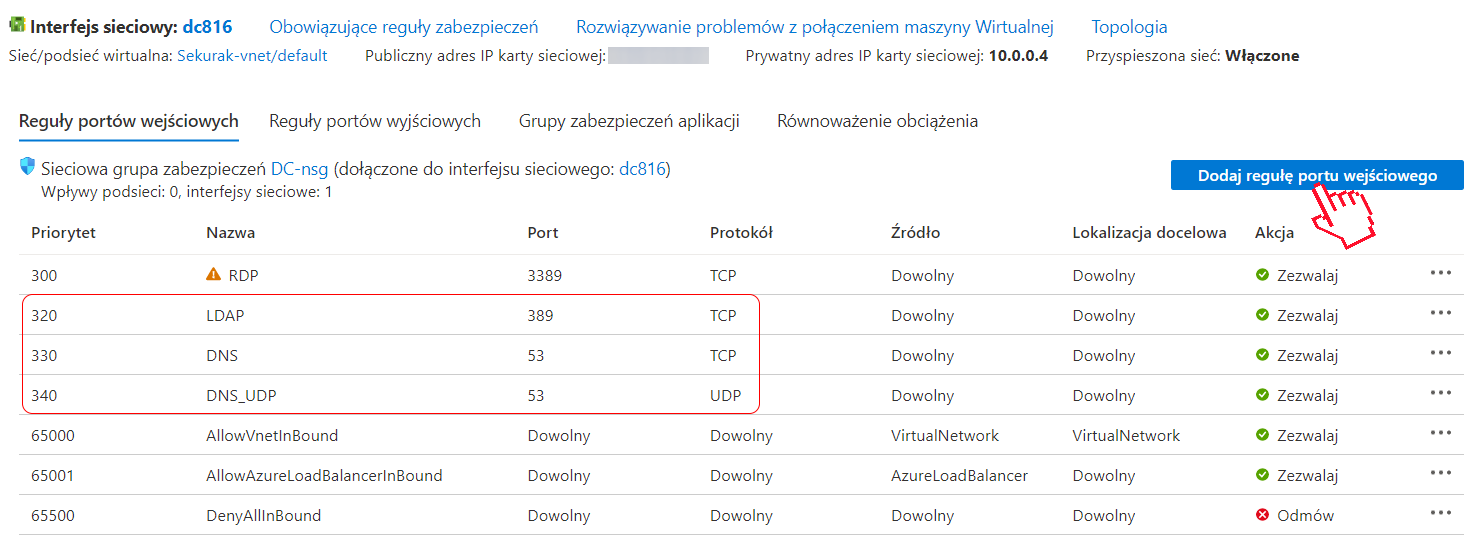
Each machine in this lab has a public IP address (also called an external IP address), which makes them theoretically visible and accessible from the Internet. Theoretically, because traffic to the virtual machine is filtered by software called a firewall. For this reason, it will be required to allow network traffic (Figure 18) for the needed services, that is, in the case of the created Windows Server, these will be LDAP and DNS (Figure 19).