Collecting information about the domain environment with SharpHound
A program that collects domain environment data – SharpHound is a component of the BloodHound tool. The collection of environmental data starts when SharpHound.exe is run on one of the computers.
The entire BloodHound package can be downloaded (Figure 32) from the address:
https://github.com/BloodHoundAD/BloodHound/releases
After downloading and attempting to run the SharpHound software (SharpHound.exe or SharpHound.ps1 to run in memory without dumping the .exe file to disk), a Microsoft Defender software prompt will be reported, which can be ignored in this experiment (Figure 33).


An example of a command that invokes SharpHound (Figure 3) might look as below:
.\SharpHound.exe –domain blue-umbrella.online
All parameters for calling SharpHound are described in the documentation. The program can be run on Windows Server, on a Windows workstation connected to a domain, or even on a workstation not connected to a domain (Figure 26 earlier).
When the reconnaissance is complete, SharpHound will terminate with the message: Happy Graphing!, and a ZIP archive with the collected data will appear in a folder next to the program (Figure 3). The ZIP file can be transferred outside the tested Active Directory environment for analysis on your own computer.
Red teams and other attackers will, of course, want to move the data collected in the ZIP archive out of sight.

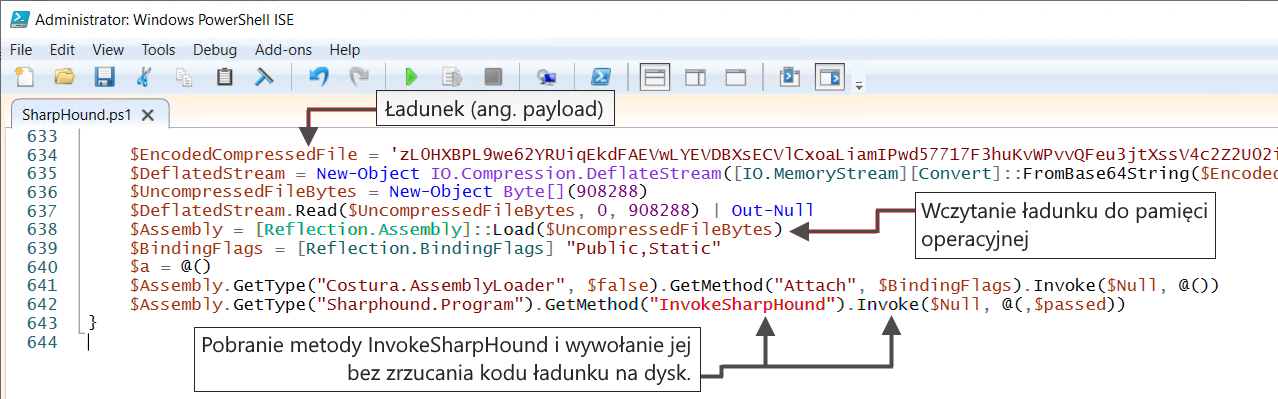
Among the data-collecting programs included with the SharpHound tool, you can find a PowerShell script called SharpHound.ps1, which starts the SharpHound tool in memory without dumping the file to the computer’s disk (Figure 35). This is to avoid detection of the tool by antivirus and EDR (Endpoint Detection and Response) systems.
In addition, the SharpHound.exe command line has parameters such as:
- EncryptZip – protect the created ZIP archive with a random password,
- RandomizeFilenames – applying random names to created files,
- Throttle and Jitter – use of random delay values in milliseconds between scans of individual computers,
- NoSaveCache – not creating a cache file on disk so that it is not easily detected by antivirus or EDR software.
Visualizing data in graph form using BloodHound
In order to analyze the Active Directory environment for complex attack paths and dangerous links, the ZIP archive file created in the earlier step should be imported into the Neo4j database via the BloodHound graphical interface.
In order to run the data visualizer, it is necessary to install the mandatory software in the form of Oracle JDK and the Neo4j database. Oracle JDK version 11 can be downloaded from:
https://www.oracle.com/pl/java/technologies/javase/jdk11-archive-downloads.html
The Java environment is needed to run the Neo4j database server. The Community version of the Neo4j server can be downloaded from:
https://neo4j.com/download-center/#community
With the command:
neo4j.bat console
you can start the server in a command line window, then if you close the console, the server will also stop.
It is also possible to install the Neo4j server as a service on Windows with the command:
neo4j.bat install-service
Running the Neo4j server at the command line is shown in Figure 5. Be sure to keep the server running while using BloodHound.

When starting Neo4j for the first time, change the password. The default username and password is neo4j:neo4j (Figure 37)
To change the password, open http://localhost:7474/ in a web browser and set a new password for the Neo4j database in the form (Figure 38).


After this procedure, it is possible to log in to BloodHound (Figure 39).

To be sure, check that the Neo4j database server is running in the background. Next, you can log into BloodHound and drag the ZIP archive file with data generated earlier by SharpHound over the program window (Figure 40).

The initial visualization in Figure 10 shows the users (MemberOf attribute) of the Domain Admins group. You can read more about groups at: Active Directory Security Groups | Microsoft Docs.
Users who are members of the Domain Admins group can manage the domain and are the default owners of any object created in the Active Directory domain.
In addition, the Domain Admins group controls access to all controllers in the domain and can modify the membership of all accounts, including those with administrator rights in the domain.

BloodHound software has a built-in set of ready-made queries (Table 1) that will help you find dangerous relationships between objects in Active Directory and other valuable information.
Note: Without preparing an advanced test environment, many queries may not return any results. Therefore, running an example for each query is beyond the scope of this text.
Table 1. Selected queries of BloodHound with description
| Find all Domain Admins | Finds all accounts belonging to the Domain Admins group |
| Find Computers where Domain Users are Local Admin | Finds computers where domain user accounts have local admin rights |
| Find All Paths from Domain Users to High Value Targets | Finds all paths from domain user accounts to nodes marked as high value targets on the graph |
| Find Workstations where Domain Users can RDP | Finds workstations where domain user accounts can connect via remote desktop |
| Find Servers where Domain Users can RDP | Finds servers where domain user accounts can connect via remote desktop |
| Find Dangerous Rights for Domain Users Groups | Finds dangerous access rights for domain user account groups |
| Shortest Paths to High Value Targets | Finds the shortest path to nodes marked as high value targets on the graph |
| Shortest Paths from Domain Users to High Value Targets | Finds the shortest path from domain users accounts to nodes marked on the graph as high value targets |
| Find Shortest Paths to Domain Admins | Finds shortest paths to user accounts from Domain Admins group |
| … | … |
The graph presented by the BloodHound tool consists of nodes. By clicking the right mouse button, it is possible to view the properties of a given node (Figure 42). It is possible to edit, delete, set as start, end, owned, high value , and even find the shortest path going to that node.

The example in Figure 43. shows groups with administrator rights by typing in the search field:
group:Admin
Other prepends are as follows:
- Group
- Domain
- Computer
- User
- OU (organizational unit)
- GPO (group policy objects)
An important clue for the uninitiated is that administrators are not just a group of Domain Admins. There can be more groups, as shown in Figures 12 and 13.


When reconstructing the attack path during post-breach analysis, the ability to mark nodes as owned proves to be a useful option. This makes it possible to look for paths leading both from compromised machines or accounts and to compromised objects (Figure 45).

Individual graph nodes can have a high value designation, which means a high-value object. What is meant here is the value to the attacker, such as a user with high rights or having valuable data on his machine. Some nodes (such as a domain controller) are marked as high value by default. An example of marking an account as high value (diamond icon) is shown in Figure 46.

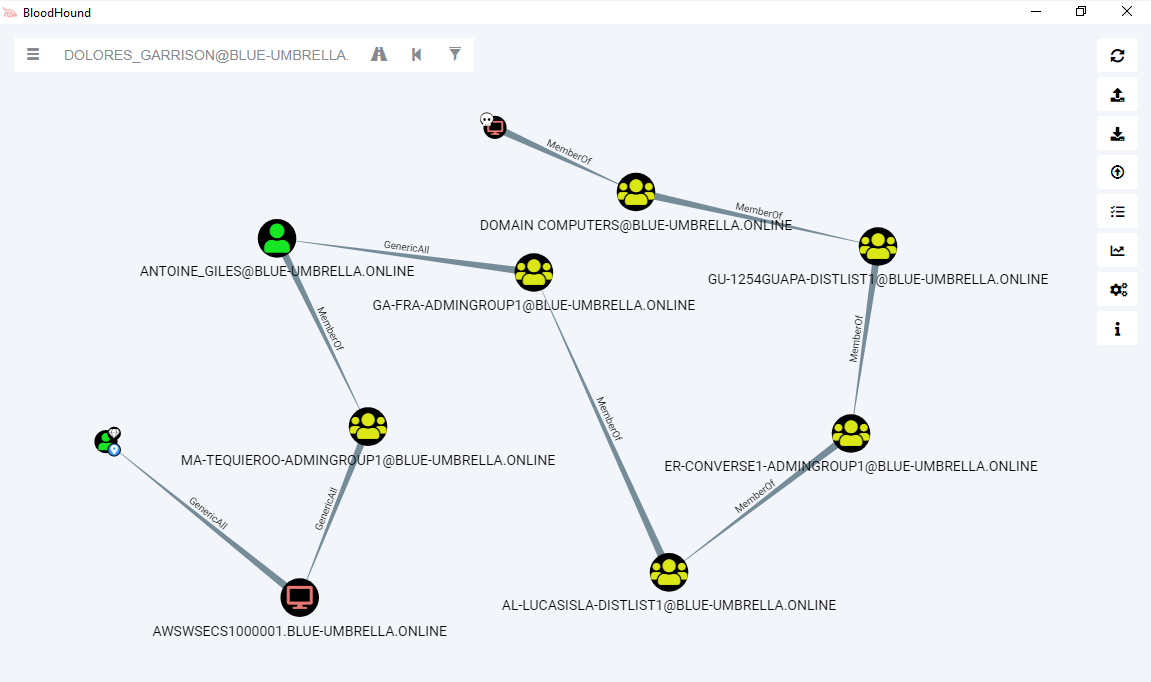
As a simple experiment, let’s try to find the shortest path from the computer FINWVIR1000000 marked in Figure 45. as compromised to the user account DOLORES_GARRISON marked in Figure 46. as a high value object. The option that launches the search for the shortest path between the mentioned objects is shown in Figure 47.

The attack path in Figure 48. from the compromised machine FINWVIR1000000 leads through various groups, and the MemberOf attribute indicates that no abuse is needed because the computer is a member of these security groups. Following the path by sight after the MemberOf attribute five times, the GenericAll attribute appears, indicating that the compromised machine belonging to these security groups has full rights to the ANTOINE_GILES user account. Further this account is a member of the MA-TEQUIEROO-ADMINGROUP1 group, which has full rights (GenericAll) to the AWSWSECS1000001 computer, which has GenericAll rights to the user account marked as a high-value resource.
In most cases, both red teams and other attackers look for the shortest path to high-privileged user accounts. An example attack might start by infecting the user’s end workstation, and then include attempts at privilege escalation to take the shortest path further (Figure 49) to perform lateral movement from device to device and get to the domain controller, securing administrator rights. For this reason, the BloodHound tool can be very helpful during post-breach analysis to reconstruct a potential attack path.
Another practical example would be to mark the FREDERIC_MIDDLETON account as compromised and try to find a path leading from that account to a high-value resource such as a group of domain controllers (Figure 49).

It is possible to impose filters on attributes in the graph as shown in Figure 50. For example, checking CanRDP when searching for paths will include objects in the graph that have the right to connect via a remote desktop. This allows attackers, for example, to look for attack vectors with set attributes.

BloodHound also allows you to add nodes, connections between them, organize the layout, and even import and export the graph (Figure 51).

As you can see, the examples shown are just the tip of the iceberg, as the capabilities of the BloodHound tool are truly vast. When combined with the BadBlood script, you can create an Active Directory environment to train blue teams in detecting dangerous links and attack paths.
Finally, it is worth remembering not to run the BadBlood tool on production systems, as this can create a lot of random objects and the changes will be difficult to reverse.
A few words of summary
The aforementioned examples clearly illustrate that the links between any objects in an Active Directory environment should be reviewed and analyzed for hidden dangers. It’s worth mentioning that the CrowdStrike website already described the ethical use of the BloodHound tool in 2018, which involves much easier detection of user accounts created by attackers as back doors providing unauthorized access to the Active Directory environment. Hidden accounts of this type can be used, for example, to take valuable data out of an enterprise.
BloodHound software is also another perfect example of how many cyber security tools can serve both good and bad purposes.
Table of Contents
BloodHound: Six Degrees of Domain Admin — BloodHound 3.0.3 documentation | https://bloodhound.readthedocs.io/en/latest/
BloodHound, Software S0521 | MITRE ATT&CK® | https://attack.mitre.org/software/S0521/
Hidden Administrative Accounts: BloodHound to the Rescue (crowdstrike.com) | https://www.crowdstrike.com/blog/hidden-administrative-accounts-bloodhound-to-the-rescue/
GitHub – davidprowe/BadBlood: BadBlood by @davidprowe, Secframe.com | https://github.com/davidprowe/BadBlood
BloodHound – Sniffing Out the Path Through Windows Domains | SANS Institute | https://www.sans.org/blog/bloodhound-sniffing-out-path-through-windows-domains/
BloodHound with Kali Linux: 101 – Red Teaming Experiments (ired.team) | https://www.ired.team/offensive-security-experiments/active-directory-kerberos-abuse/abusing-active-directory-with-bloodhound-on-kali-linux
How to Detect and Block Bloodhound Attacks | CrowdStrike | https://www.crowdstrike.com/blog/how-to-block-bloodhound-attacks/
Active Directory Security Groups — Windows security | https://docs.microsoft.com/en-us/windows/security/identity-protection/access-control/active-directory-security-groups